
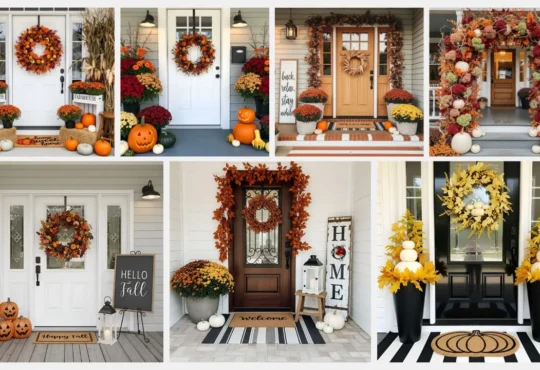
As autumn rolls in, it’s time to embrace the season with festive decorations, and what better way to start than with a stunning wreath on your front door? While traditional fall wreaths ideas featuring pumpkins, leaves, and berries are always beautiful, why not try something a little more unexpected this year? Whether you’re into modern minimalism, rustic charm, or quirky creativity,
This list of 19 unusual fall wreath ideas will inspire you to add a distinctive touch to your fall decor.
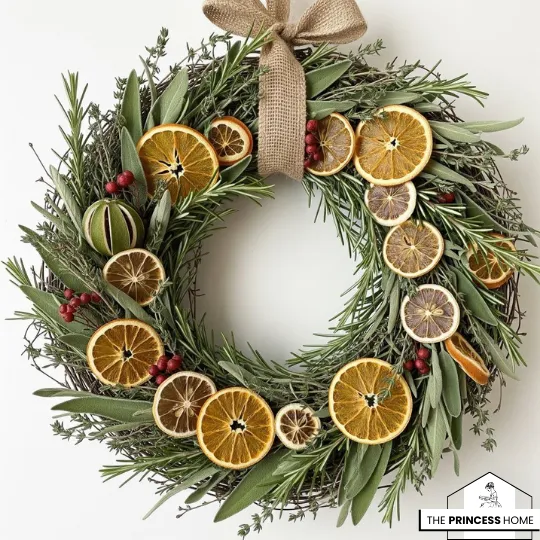
1. Dried Citrus &Herb Wreath
If you’re looking for a refreshing take on the traditional fall wreath ideas, consider using dried citrus and herbs. Orange and lemon slices add a burst of vibrant color, while aromatic herbs like rosemary, sage, and thyme offer a delightful fragrance. This wreath is perfect for anyone who loves natural materials and a farm-to-table vibe. Hang it on your front door to welcome guests with a fresh and zesty scent that complements the cool, crisp air of autumn.Here is the text combined into one, with SEO-friendly terms included.
How you can make a Dried Citrus and Herb Wreath step by step:
Materials Needed:
- Fresh oranges and lemons
- Fresh or dried rosemary, thyme, or sage
- Optional: eucalyptus, cinnamon sticks, star anise
- Grapevine wreath base
- Floral wire
- Burlap or velvet ribbon
- Hot glue gun
Step-by-Step Instructions:
Prepare the Dried Citrus Slice oranges and lemons into thin rounds (about ¼ inch). Place them on a parchment-lined baking sheet. Dry the slices in an oven at 200°F (90°C) for 2-3 hours, flipping them halfway through, until they are translucent and fully dried. Let them cool completely. Bundle the Herbs Gather small bundles of rosemary, thyme, or sage. Secure each bundle tightly with floral wire to make them easy to attach to the wreath. If using eucalyptus, cut small sprigs to add to your bundles.
Assemble the Wreath Begin with your grapevine wreath base. Layer the herb bundles around the wreath, securing them with floral wire and overlapping each bundle slightly to create a full, lush appearance. Add Citrus and Spices: Attach the dried citrus slices by wiring them through the rind or using a hot glue gun to secure them onto the wreath. For an extra fall fragrance, tuck in cinnamon sticks or star anise. Fill in any gaps with extra herbs or citrus slices.
Once complete, add a burlap or velvet ribbon for hanging. Enjoy your beautiful and aromatic natural fall decor!
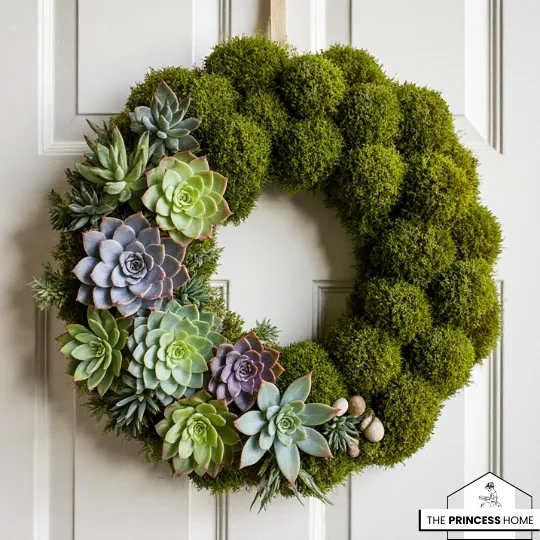
2. Succulent &Moss Wreath
Bring the outdoors in with a wreath made from succulents and moss. Instead of relying on typical autumn foliage, this design features living succulents in shades of green, silver, and purple, nestled among rich, vibrant moss. The natural texture adds depth, while the earthy tones of the succulents make this wreath a modern twist on fall decor. To make it even more unique, add in some air plants or small pebbles.
How you can make a Succulent & Moss Wreath step by step:
🛠 Materials You’ll Need:
- A sturdy wire wreath frame or grapevine base
- Sheet moss or sphagnum moss
- Floral wire, floral pins, or a hot glue gun
- Small living succulents in various colors (e.g., green, purple, silver)
- Scissors and gloves
- Optional: air plants, decorative pebbles, or small driftwood pieces
Step-by-Step Instructions:
Soak your moss in water for about 15 minutes, then squeeze out the excess so it’s damp but not dripping. Begin to wrap the entire wreath frame with the moss, securing it tightly with floral wire. This forms a perfect base for your succulents to root. Gently remove any excess soil from the roots of your succulents. If the roots are long, you can trim them slightly. If you’re using succulent cuttings, let the ends dry out for a few hours before planting to prevent rot. Use your finger or scissors to poke small holes in the moss. Carefully insert the succulents into these holes, gently pressing them into place.
Start with your larger succulents and then fill in the gaps with smaller ones. For extra style, you can tuck in air plants, pebbles, or driftwood pieces. Use floral pins or wire to secure any larger or heavier plants. After assembly, lay the wreath flat for 1-2 weeks to allow the succulents to root securely. Once ready, hang it in a location with bright, indirect sunlight. Mist the wreath lightly every few days to keep the moss and succulents hydrated. This living wreath will grow and evolve, providing a fresh, sculptural look for your fall home decor.
Mist every 1-2 weeks. Hang in a spot with bright, indirect sunlight. Bring indoors if temperatures drop below freezing.
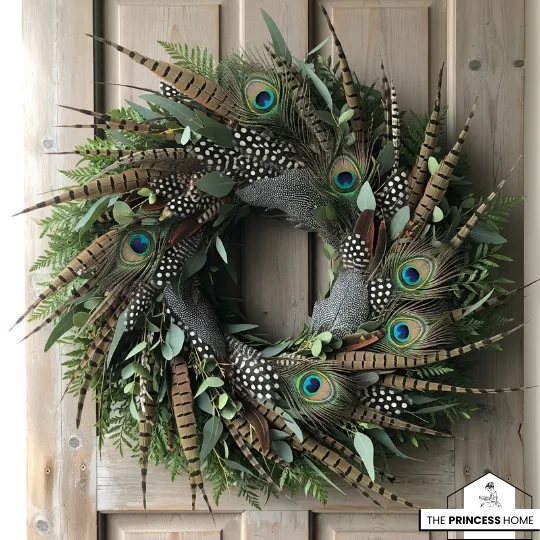
3. Feather &Foliage Wreath
Step away from the ordinary with a wreath adorned with elegant feathers. Pheasant, peacock, or guinea feathers lend a rich, luxurious look, perfect for a dramatic autumn entrance. Pair the feathers with some simple foliage like eucalyptus or fern for a wreath that’s both striking and sophisticated. It brings an unexpected element of texture and style that will impress any visitor.
How you can make a Feather & Foliage Wreath step by step:
🛠 Materials You’ll Need:
- Grapevine or wire wreath frame
- Selection of feathers (pheasant, peacock, guinea, or mixed)
- Foliage (eucalyptus, fern, or other greenery – fresh or faux)
- Floral wire or hot glue gun
- Ribbon or twine (optional, for hanging)
- Scissors/wire cutters
Step-by-Step Instructions:
Start with your grapevine or wire wreath frame. If using a wire frame, cover it with a layer of foliage (like eucalyptus) to create a soft, natural backdrop. Secure with floral wire. Layer eucalyptus, fern, or other greenery around the wreath in one consistent direction (clockwise or counterclockwise). Secure each bundle with floral wire so it looks lush but not overcrowded. Insert feathers in small clusters or fan them out for a dramatic effect.
Place longer feathers (like pheasant or peacock) at angles for height and elegance. Tuck in smaller feathers (like guinea) around the edges to add texture and contrast. Secure them with floral wire or a dab of hot glue. Add a ribbon, velvet bow, or metallic accent (gold berries, small pinecones) for extra seasonal flair. Fluff and adjust until the feathers and foliage look balanced. Hang on your door or wall as a bold autumn statement piece.
A striking and sophisticated wreath that blends natural greenery with the luxurious texture of feathers — perfect for a unique and stylish fall entrance.
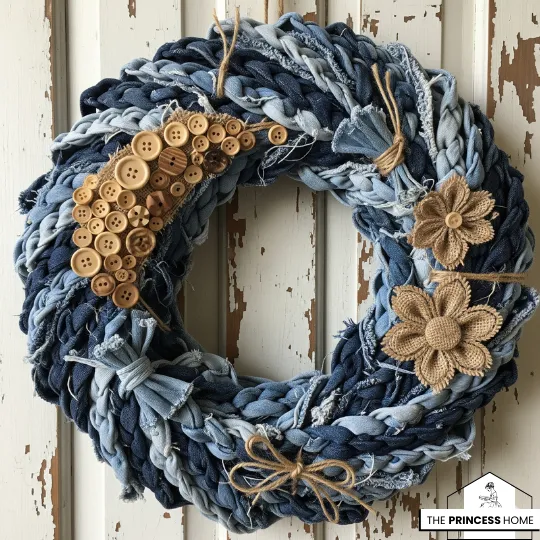
4. Upcycled Denim Wreath
Repurpose old denim to create a casual, rustic wreath with a surprising twist. Cut denim into strips and either braid or tie it around a wire or foam base to form the body of the wreath. Add embellishments like wooden buttons, burlap flowers, or twine to enhance the look. This eco-friendly and unique design is perfect for a farmhouse-style home or anyone looking for a touch of Americana charm.
How you can make a Upcycled Denim Wreath step by step:
🛠 Materials You’ll Need:
- Old denim jeans (various washes for texture)
- Wire or foam wreath frame
- Scissors (fabric scissors recommended)
- Hot glue gun or floral pins
- Optional embellishments: wooden buttons, burlap flowers, twine, lace, or rustic patches
Step-by-Step Instructions:
Prepare the Denim Cut old jeans into strips (1–2 inches wide, 8–12 inches long). Use a mix of light, medium, and dark washes for depth. For a rustic feel, fray the edges by pulling a few loose threads. Build the Wreath Base Tie each strip around the wreath frame in a knot, pushing them close together until the frame is covered. Braided Style: Braid three denim strips, then wrap the braid around the frame, securing the ends with hot glue or floral pins.
Add Embellishments Attach burlap flowers or denim rosettes for texture. Hot glue wooden buttons, twine spirals, or lace bows for extra charm. For an Americana twist, add a rustic star or flag-inspired accent. Fluff the denim strips so the wreath looks full and even. Add a loop of twine or denim for hanging. Display indoors for a cozy farmhouse vibe, or on a covered porch for rustic outdoor charm.
A casual, rustic, and eco-friendly wreath with cozy farmhouse character giving old jeans a fresh life as charming seasonal décor.
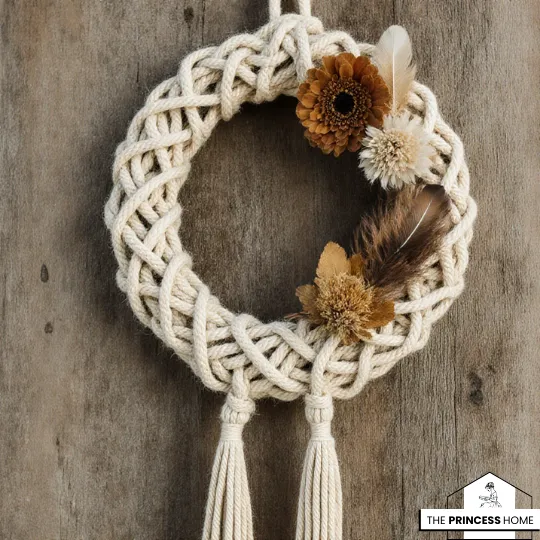
5. Macramé Wreath
For a bohemian touch, create a wreath using macramé. Using cotton cord or rope, tie intricate knots to form a wreath with plenty of texture and personality. You can leave it bare for a minimalist look or adorn it with dried flowers, feathers, or tassels in autumnal shades. Macramé wreaths add a handcrafted, organic element to your fall decor and can easily transition to other seasons by swapping out the accents.
How you can make a Macramé Wreath step by step:
🛠 Materials You’ll Need:
- Metal or wooden wreath ring (choose the size you like)
- Cotton macramé cord or rope (3–5 mm thickness works well)
- Scissors
- Hot glue gun (optional, for attaching embellishments)
- Optional accents: dried flowers, feathers, tassels, or beads
Step-by-Step Instructions:
Prepare the Base Secure one end of the cord to your wreath ring with a knot. Cut multiple lengths of cord, depending on your design, and attach them evenly spaced around the ring using a lark’s head knot. Create the Macramé Pattern Use simple knots like the square knot or half hitch to build your design around the wreath. Keep it uniform for a clean, minimalist style, or mix patterns for a more eclectic boho look. Shape the Wreath Allow some cords to hang freely as fringe, trimming the ends neatly or in a V-shape. For a fuller design, knot all the way around the ring until it’s completely covered.
Add Embellishments Attach dried flowers, feathers, or tassels with hot glue or by weaving them into the cord. Stick to warm autumn tones—rust, mustard, deep green—for seasonal flair. Swap them out later to refresh the look for winter, spring, or summer.
Fluff the fringe, adjust knots for even spacing, and trim as needed. Hang your wreath with a loop of macramé cord for a seamless, handcrafted finish.
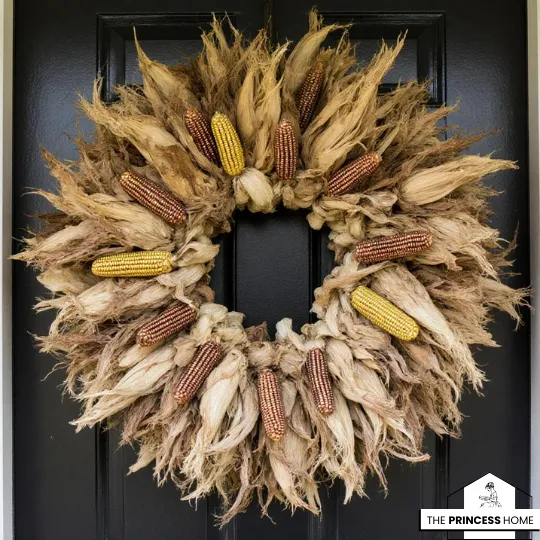
6. Corn Husk Wreath
Corn husks, a staple of fall decor, can be arranged into a wreath for an unexpected yet seasonal display. Layer dried corn husks in a circular pattern, creating a voluminous design with lots of texture. For added flair, spray paint the husks in warm metallics like gold or copper, giving your wreath a chic and sophisticated edge. This wreath is a perfect choice for anyone looking to add a rustic, harvest-inspired element to their fall decor.
How you can make a Corn Husk Wreath step by step:
🛠 Materials You’ll Need:
- Wire or foam wreath form
- Dried corn husks (available at craft stores or saved from corn cobs)
- Hot glue gun and glue sticks
- Floral wire (optional for extra security)
- Scissors
- Optional accents: spray paint (gold, copper, bronze), raffia bow, or small decorative corn
Step-by-Step Instructions:
Prepare the Corn Husks Soak husks in warm water for 10–15 minutes to make them pliable. Pat dry with a towel so they’re damp but not wet. Attach the Husks Starting at the inner edge of the wreath form, glue or wire corn husks in layers, overlapping slightly. Work in one consistent direction (clockwise or counterclockwise) until the base is covered. Build Volume and Texture Add a second layer of husks, staggering them to create fullness.
Keep outer edges longer for a dramatic, feathery look, trimming any uneven tips as needed. Add Metallic Accents Lightly spray paint sections of the husks in gold, copper, or bronze for a chic, modern twist. Leave some husks natural for contrast. Add a raffia bow, rustic ribbon, or small decorative corn at the bottom for extra harvest charm. Attach a loop of twine or wire for hanging.
A rustic yet sophisticated wreath that combines natural harvest textures with a hint of metallic shine — a perfect autumn statement piece.
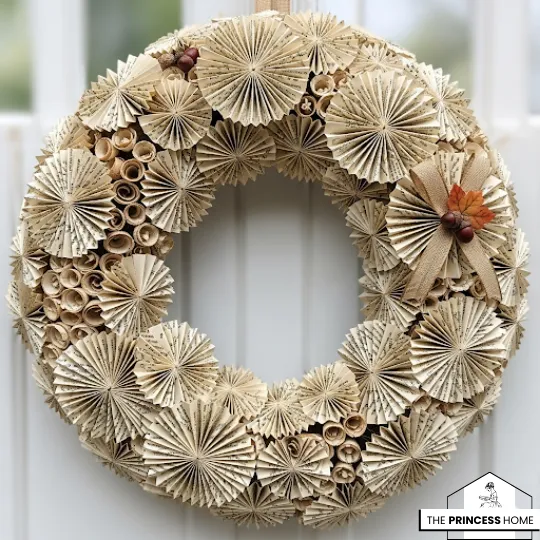
7. Book Page Wreath
Book lovers will appreciate the charm of a wreath made entirely out of old book pages. Roll or fold the pages into different shapes, such as cones, rosettes, or fans, and attach them to a wreath form for a textured, monochromatic design. The neutral colors of the pages make this wreath versatile enough to suit any front door. Add a small fall-themed ribbon or embellishment for a nod to the season without overpowering the literary look.
How you can make a Book Page Wreath step by step:
🛠 Materials You’ll Need:
- Foam or cardboard wreath form
- Old book pages (yellowed or vintage ones work beautifully)
- Hot glue gun and glue sticks
- Scissors
- Optional accents: burlap or satin ribbon, twine bow, small seasonal embellishments (acorn, leaf charm, or pumpkin)
Step-by-Step Instructions:
Prepare the Pages Tear out pages from an old or unused book. Trim edges if needed. Decide on your preferred style—cones, rosettes, or folded fans—and shape each page accordingly. Build the Base Layer Start gluing folded or rolled pages around the wreath form, pointing outward. Overlap them slightly to cover the base and create depth. Add More Layers Continue adding rows of pages, layering inward as you go. Mix page styles (cones with rosettes or fans) for extra texture and visual interest.
Create a Focal Point Add a cluster of smaller rosettes or rolled pages at the bottom or side of the wreath for dimension. This can act as the centerpiece of your design. Tie a burlap or satin ribbon at the top or bottom for hanging. For a subtle autumn feel, add a small embellishment like a mini pumpkin, leaf charm, or acorn without overwhelming the neutral book-page aesthetic.
A whimsical and literary wreath that celebrates the beauty of old books, blending texture and simplicity into a timeless piece of fall décor.
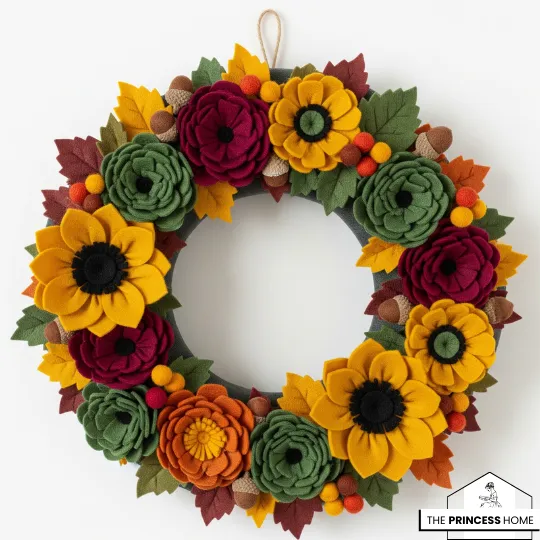
8. Felt Flower Wreath
For a cozy and creative wreath idea, craft flowers out of felt. Choose felt in deep fall colors such as mustard, burgundy, forest green, and burnt orange. Form the felt into various flower shapes like dahlias, roses, or sunflowers, and arrange them on a foam wreath base. The soft texture of the felt adds warmth to your decor and makes this a whimsical, handmade alternative to traditional wreaths.
How you can make a Felt Flower Wreath step by step:
🛠 Materials You’ll Need:
- Foam wreath base
- Felt sheets in fall colors (mustard, burgundy, forest green, burnt orange, cream)
- Scissors
- Hot glue gun and glue sticks
- Paper flower templates (optional, for uniform petals)
- Ribbon or twine (for hanging)
Step-by-Step Instructions:
Cut the Felt Pieces Trace or freehand petal shapes onto felt sheets and cut them out. Use different sizes to create layered flowers. For rolled roses, cut spirals and roll them tightly. Assemble the Flowers Glue petals together to form flowers like dahlias, sunflowers, or roses. Layer small petals inside larger ones for a realistic look. Mix colors for contrast and variety. Attach Flowers to the Base Starting at one side, hot glue the finished felt flowers directly onto the foam wreath base.
Overlap them slightly for fullness and cover the entire frame or just a section for a crescent-style wreath. Fill in Gaps Add smaller flowers, felt leaves, or greenery cutouts to fill spaces. Arrange them in clusters to create balance and depth. Finishing Touches Attach a ribbon or twine loop to the back for hanging. For extra seasonal flair, tuck in a few felt acorns or mini pumpkins in complementary colors.
A warm, whimsical wreath that combines handmade charm with autumn’s rich palette — a perfect statement piece for a cozy fall home.
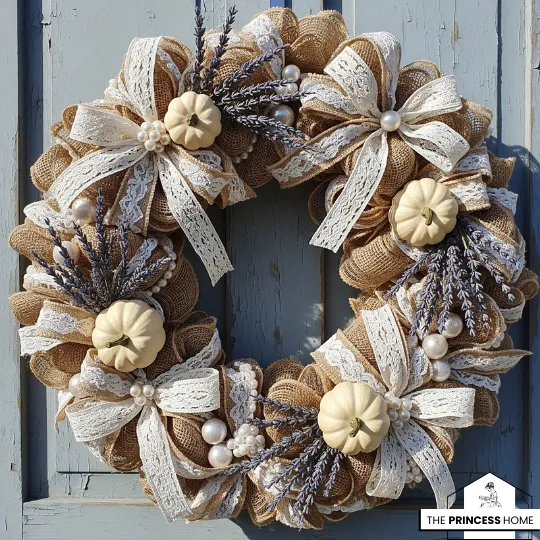
9. Burlap &Lace Wreath
Burlap is often associated with fall decor, but pairing it with lace gives it a softer, more delicate look. Wrap a wreath base in strips of burlap, then layer lace ribbons or doilies on top. Add embellishments like small white pumpkins, dried lavender, or pearl accents for a rustic yet elegant wreath. This design is perfect for those who love the farmhouse or shabby chic style.
How you can make a Burlap &Lace Wreath step by step:
🛠 Materials You’ll Need:
- Foam or wire wreath base
- Burlap ribbon or fabric strips
- Lace ribbon or vintage lace doilies
- Hot glue gun and glue sticks
- Scissors
- Optional accents: mini white pumpkins, dried lavender, pearl beads, or rustic buttons
- Twine or satin ribbon for hanging
Step-by-Step Instructions:
Wrap the Base Secure one end of the burlap ribbon to the wreath base with hot glue. Wrap the burlap tightly around the form until it’s fully covered, gluing down the end to secure. Layer the Lace Add strips of lace ribbon or sections of doilies on top of the burlap. Wrap them evenly spaced around the wreath or cluster them on one side for a more decorative accent. Add Embellishments Attach mini white pumpkins, sprigs of dried lavender, or pearl beads with hot glue.
Arrange them in clusters for a balanced look, keeping to a rustic-yet-elegant theme. Create Texture and Balance Alternate between lace and embellishments so the wreath has both softness and structure. Adjust until the elements look harmonious and not overcrowded. Add a bow made of lace or satin ribbon at the bottom for a farmhouse touch. Attach twine or ribbon at the top for hanging.
A rustic yet refined wreath that blends the earthy charm of burlap with the delicate elegance of lace — perfect for farmhouse or shabby chic fall decor.
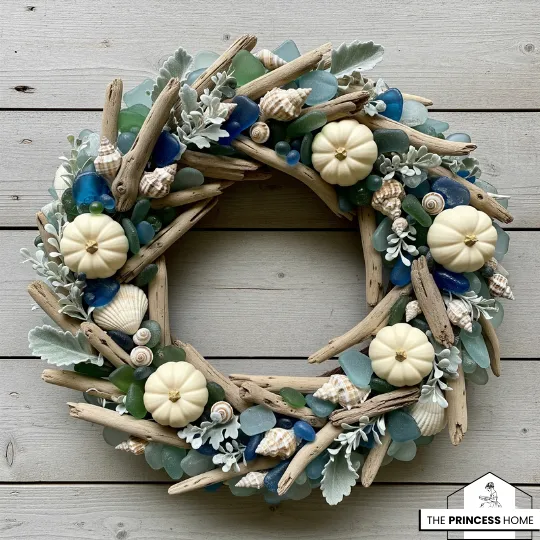
10. Driftwood &Shell Wreath
For a coastal-inspired fall wreath, use driftwood and seashells to bring a beachy vibe to the autumn season. Arrange pieces of driftwood in a circular pattern and glue seashells or sea glass in between the gaps. You can also add subtle fall elements like small white pumpkins or silver foliage for a coastal-meets-autumn look. This wreath is ideal for those living near the beach or anyone who wants to keep summer alive a little longer.
How you can make a Driftwood &Shell Wreath step by step:
🛠 Materials You’ll Need:
- Grapevine or wire wreath form
- Small pieces of driftwood (varied sizes)
- Seashells, starfish, or sea glass
- Hot glue gun and glue sticks
- Scissors or wire cutters
- Optional accents: mini white pumpkins, silver-painted leaves, raffia, or twine
- Ribbon or jute cord for hanging
Step-by-Step Instructions:
Prepare the Base Start with a grapevine or wire wreath form. If using wire, wrap it with twine or burlap for better grip before attaching driftwood. Attach the Driftwood Arrange driftwood pieces in a circular pattern, layering them to mimic the natural flow of waves. Secure each piece with hot glue, overlapping slightly to cover the frame. Add Seashells & Sea Glass Glue seashells, starfish, or sea glass in the gaps between driftwood pieces.
Mix sizes and textures for a balanced, coastal look. Incorporate Autumn Elements For seasonal flair, add small white pumpkins, sprigs of silver-painted foliage, or raffia bows. Keep accents minimal so the coastal feel remains dominant. Attach a loop of jute cord or ribbon to the back for hanging. Fluff and adjust any loose elements until the wreath feels balanced.
A coastal-meets-autumn wreath that blends beachy textures with subtle fall details — perfect for keeping summer’s spirit alive while embracing the season.
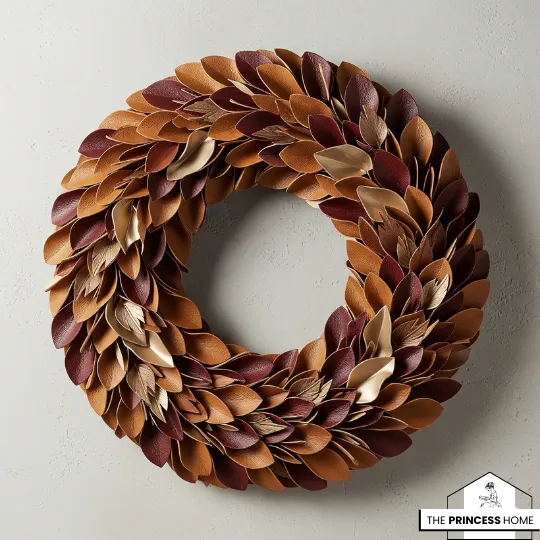
11. Faux Leather Leaf Wreath
Faux leather leaves bring a touch of luxury and modernity to your fall decor. Cut out leaf shapes from leather or faux leather in warm autumn tones like caramel, chestnut, and burgundy. Arrange them in overlapping layers on a wreath base, and add a few metallic accents for a polished, elegant look. This wreath is perfect for those who prefer a sleek, contemporary take on fall decor.
How you can make a Faux Leather Leaf Wreath step by step:
🛠 Materials You’ll Need:
- Foam or wire wreath form
- Faux leather sheets (caramel, chestnut, burgundy, or mixed autumn tones)
- Scissors or craft knife
- Hot glue gun and glue sticks
- Metallic accents (gold or copper leaves, beads, or studs)
- Ribbon, twine, or leather cord for hanging
Step-by-Step Instructions:
Cut the Leaves Trace and cut out multiple leaf shapes from faux leather sheets. Vary the sizes and shapes (maple, oak, or simple ovals) for depth and visual interest. Prepare the Base If using a foam wreath, cover it with a strip of fabric, burlap, or leather for a smooth background before adding leaves. Layer the Leaves Starting at one point, glue the faux leather leaves in overlapping layers around the wreath form.
Work in one direction (clockwise or counterclockwise) for a cohesive look. Add Metallic Accents Tuck in metallic leaves, beads, or studs between the layers for a modern, polished finish. Keep them minimal so they accent rather than overpower the design. Attach a ribbon, twine, or leather cord loop at the top for hanging. Adjust and smooth the leaves until the wreath looks sleek and balanced.
A modern, elegant wreath that pairs warm autumn tones with luxe textures — a chic statement piece for contemporary fall decor.
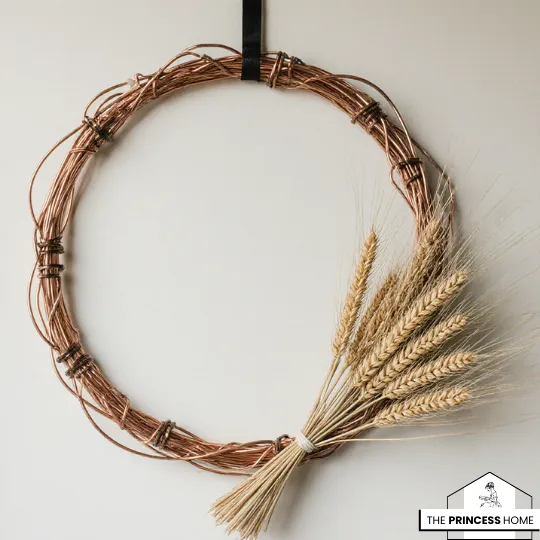
12. Copper &Wheat Wreath
Celebrate the harvest season with a wreath made from copper wire and wheat stalks. Bend the copper wire into a wreath form, leaving parts of it exposed for a minimalist, industrial look. Attach bundles of wheat stalks to one side, creating a half-wreath design. The combination of the natural wheat and the shiny copper brings warmth and sophistication to your front door.
How you can make a Copper &Wheat Wreath step by step:
🛠 Materials You’ll Need:
- Thick copper wire (or a pre-made copper wreath ring)
- Wheat stalks (dried, natural, or bleached)
- Floral wire
- Wire cutters & scissors
- Hot glue gun (optional, for extra hold)
- Ribbon or twine for hanging (optional)
Step-by-Step Instructions:
Form the Base Bend thick copper wire into a circular shape, securing the ends by twisting them together. Leave sections of the copper exposed for a modern, minimalist look. Prepare the Wheat Stalks
Gather small bundles of wheat and trim the stems to a uniform length. Tie each bundle with floral wire to keep them neat and easy to attach. Attach the Wheat Position the bundles along one side (or bottom half) of the copper ring.
Secure each bundle with floral wire, layering them slightly so the stems overlap and the tops fan outward. Create the Half-Wreath Design Continue adding bundles until one side of the wreath is full, leaving the other side bare to highlight the copper. Adjust stalks to create a balanced, natural flow. Fluff the wheat stalks for volume and trim any uneven ends. Add a ribbon, twine bow, or leave it bare for a sleek finish. Attach a loop at the top for hanging.
A harvest-inspired wreath that blends rustic wheat with industrial copper — striking, simple, and sophisticated for autumn decor.
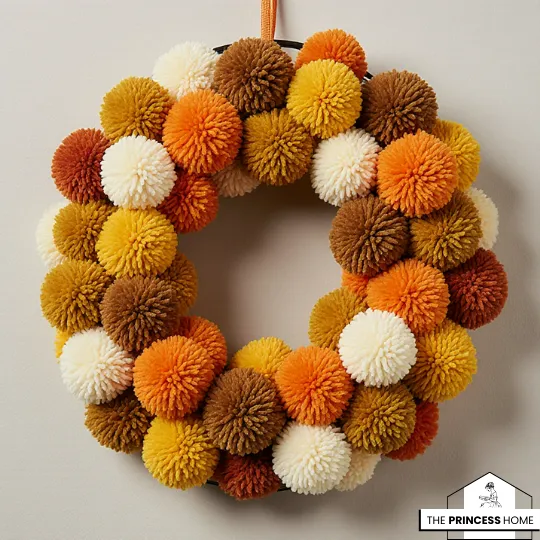
13. Pom-Pom Wreath
For a playful and colorful take on fall decor, create a wreath made entirely out of pom-poms. Choose yarn in autumnal shades like mustard, orange, rust, and cream to make pom-poms of various sizes. Attach them to a wreath form for a fluffy, tactile design that adds a sense of fun and whimsy. This wreath is perfect for homes with children or anyone who wants to add a lighthearted touch to their decor.
How you can make a Pom-Pom Wreath step by step:
🛠 Materials You’ll Need:
- Foam or wire wreath form
- Yarn in fall-inspired colors (mustard, orange, rust, burgundy, cream, etc.)
- Pom-pom maker (or cardboard as a DIY tool)
- Scissors
- Hot glue gun & glue sticks
- Ribbon or twine (optional, for hanging)
Step-by-Step Instructions:
Create Your Pom-Poms Use a pom-pom maker or DIY with cardboard circles. Wrap yarn several times, tie securely in the middle, and trim the edges to form fluffy pom-poms. Make them in a mix of sizes for variety. Prepare the Base Wrap your wreath form in yarn or fabric strips to cover it. This ensures no gaps will show between pom-poms once you attach them. Attach the Pom-Poms Begin gluing the largest pom-poms to the wreath form first, spreading them evenly.
Then fill in with medium and smaller pom-poms to create a full, balanced look. Fill in Gaps Add smaller pom-poms or extra yarn tufts in any empty spots. Vary the placement of colors to keep the wreath vibrant and playful. Attach a ribbon or twine loop at the back for hanging. You can also add a bow or a few playful embellishments like mini felt leaves or acorns for an autumnal twist.
A whimsical, cozy, and kid-friendly wreath that brings color, texture, and fun to your seasonal decor.
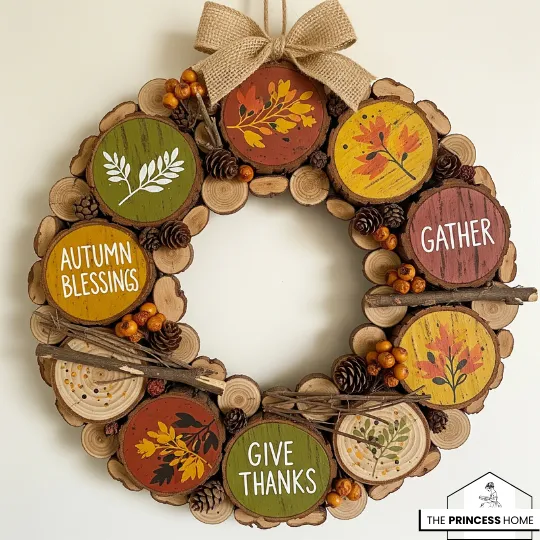
14. Wood Slice Wreath
Wood slices can be arranged into a wreath for a natural, rustic look that celebrates the beauty of woodgrain. Choose slices of varying sizes, and attach them to a wreath form in a circular pattern. For added interest, paint a few slices in fall colors or write autumn-inspired phrases on them. This wreath is ideal for homes with a woodland or cabin theme.
How you can make a Wood Slice Wreath step by step:
🛠 Materials You’ll Need:
- Grapevine, foam, or wire wreath base
- Assorted wood slices (small to medium size, cut evenly)
- Strong adhesive (hot glue or wood glue)
- Acrylic paints or wood stain (optional, for accents)
- Permanent marker or paint pen (for writing phrases)
- Small embellishments (pinecones, faux berries, or mini pumpkins)
- Ribbon, twine, or leather cord (for hanging)
Step-by-Step Instructions:
Prepare the Base Start with your chosen wreath form. If you want extra coverage, wrap it with burlap or twine before attaching the wood slices. Arrange the Wood Slices Lay out the slices around the wreath base to test your design. Mix small and large slices for a more natural, layered look. Attach the Slices Using hot glue or wood glue, secure the slices one by one onto the wreath form. Slightly overlap them to cover gaps and create depth.
Add Decorative Accents Paint a few slices in fall shades like burnt orange, mustard, or deep red. On others, write short seasonal words like Harvest, Gather, or Welcome. Embellish (Optional) Tuck in pinecones, faux berries, or mini pumpkins between slices for a festive touch. Attach a ribbon, twine, or leather cord at the top for hanging. Step back and adjust any slices to ensure balance.
A warm, rustic wreath that highlights natural textures and adds woodland charm to your autumn decor.
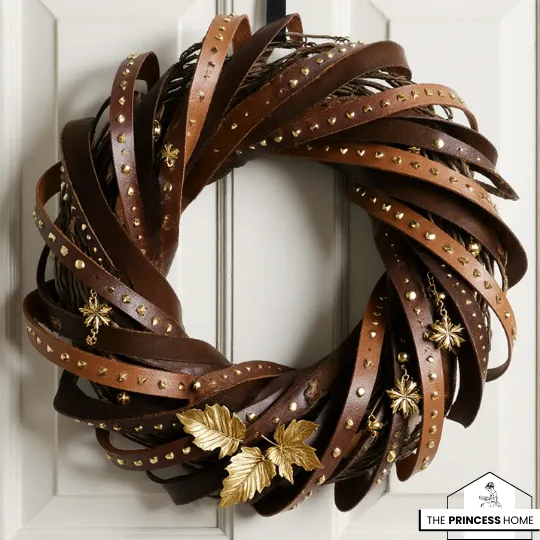
15. Leather & Gold Wreath
For a modern, high-fashion fall wreath, combine leather strips with gold accents. Use leather in deep, earthy tones, and create loops or twists around a wreath form. Add small gold embellishments like studs, charms, or metallic leaves for a striking contrast. This wreath exudes luxury and is perfect for a chic, contemporary home.
How you can make a Leather &Gold Wreath step by step:
🛠 Materials You’ll Need:
- Foam, wire, or grapevine wreath base
- Leather or faux leather strips (in shades like chestnut, deep brown, burgundy, or black)
- Gold embellishments (metallic leaves, studs, charms, or spray-painted accents)
- Hot glue gun or strong adhesive
- Scissors or rotary cutter
- Gold ribbon or metallic cord (optional, for hanging)
Step-by-Step Instructions:
Prepare the Leather Strips Cut your leather into strips of equal width (about 1–2 inches wide). Varying the length adds interest when creating loops or twists. Cover the Wreath Base Wrap the strips around the base, either tightly for a sleek look or loosely to create texture. Secure with hot glue at the back. Form Loops or Twists Use additional strips to form folded loops or elegant twists, attaching them around the wreath for dimension.
Add Golden Accents Attach metallic embellishments like gold-painted leaves, studs, or charms. Scatter them evenly or cluster them on one side for a more modern, asymmetrical style. Optional Contrast Mix in a few matte black or dark leather pieces for a bolder contrast against the gold. Attach a gold ribbon or metallic cord at the top for a polished finish.
A luxurious, contemporary wreath that blends natural textures with metallic glam—perfect for a stylish autumn entryway.

16. Apple &Cinnamon Stick Wreath
Bring a fragrant and festive touch to your front door with a wreath made from faux apples and cinnamon sticks. The rich red apples and warm brown cinnamon sticks evoke the scents and colors of fall, making this wreath as pleasing to the senses as it is to the eyes. You can add sprigs of evergreen or pinecones for an extra layer of texture and fragrance.
How you can make a Apple &Cinnamon Stick Wreath step by step:
🛠 Materials You’ll Need:
- Foam or grapevine wreath base
- Faux apples (red or green, depending on your style)
- Cinnamon sticks (real or decorative)
- Hot glue gun & glue sticks
- Evergreen sprigs (real or faux)
- Small pinecones (optional)
- Floral wire
- Ribbon (in plaid, burlap, or velvet for a seasonal finish)
Step-by-Step Instructions:
Prepare Your Base Start with a foam or grapevine wreath form. If using foam, wrap it with burlap or ribbon to give a natural background before attaching elements. Attach the Greenery Layer evergreen sprigs around the wreath, securing them with floral wire or hot glue. This creates a lush, festive backdrop. Add the Apples Glue faux apples evenly around the wreath. For a natural look, vary their placement—some grouped together, others spaced apart.
Incorporate Cinnamon Sticks Bundle cinnamon sticks in groups of two or three, then tie them with twine or wire before gluing them onto the wreath. This adds both texture and a seasonal scent. Tuck in Pinecones (Optional) Place small pinecones between the apples and cinnamon for a woodland, harvest vibe. Add a ribbon bow at the bottom or top of the wreath for a polished seasonal flair.
A warm, cozy, and fragrant wreath that instantly evokes the essence of fall—perfect for anyone who wants to greet guests with the sights (and smells) of the season.
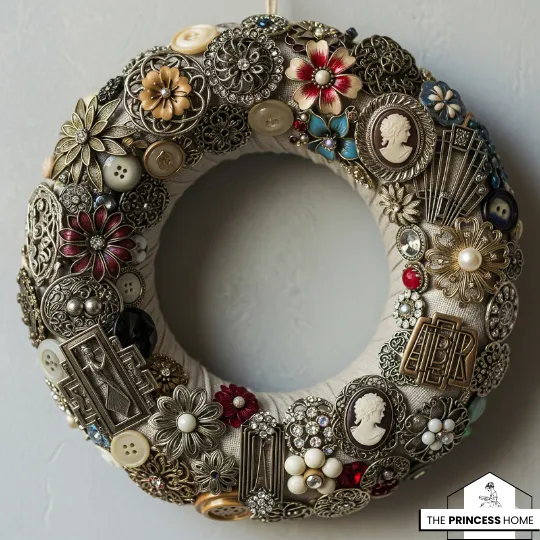
17. Vintage Brooch Wreath
For a glamorous, antique-inspired wreath, collect vintage brooches and pins to adorn your front door. Attach the brooches to a fabric-wrapped wreath base, mixing in buttons or beads for added sparkle. This wreath idea is perfect for someone who loves vintage charm and wants to create a unique and eye-catching display.
How you can make a Vintage Brooch Wreath step by step:
🛠 Materials You’ll Need:
- Foam or wire wreath form
- Fabric (velvet, satin, or burlap for the base wrap)
- Assorted vintage brooches, pins, or clip-on earrings
- Decorative buttons or beads
- Hot glue gun & glue sticks
- Straight pins or floral pins (to secure heavier brooches)
- Ribbon or lace for hanging
Step-by-Step Instructions:
Wrap the Wreath Base Cover the wreath form with your chosen fabric (velvet for luxury, burlap for rustic elegance). Secure the ends with hot glue. Arrange Brooches Lay out your vintage brooches, pins, and buttons on the fabric-covered wreath before attaching them. Mix large statement pieces with smaller, delicate ones for balance.
Secure the Brooches Attach brooches by pinning them directly into the fabric or using hot glue for a permanent hold. For extra-heavy pieces, use floral pins for reinforcement. Fill in the Gaps Add decorative buttons, beads, or faux pearls between brooches to create a lush, sparkling effect. Attach a ribbon or lace loop at the top for hanging. For extra glamour, choose a satin or metallic ribbon.
The result is a shimmering, one-of-a-kind wreath that tells a story—perfect for vintage collectors or anyone wanting to add heirloom charm to their fall decor.
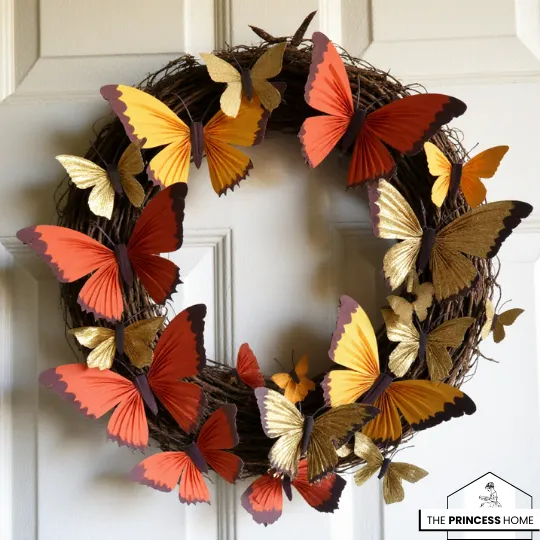
18. Paper Butterfly Wreath
A whimsical and unusual fall wreath idea is to use paper butterflies as the main design element. Choose paper in rich autumn colors or metallics, and fold it into butterfly shapes. Arrange the butterflies in clusters on a wreath form for a playful, yet elegant, look. This wreath is sure to stand out and bring a touch of magic to your fall decor.
How you can make a Paper Butterfly Wreath step by step:
🛠 Materials You’ll Need:
- Wreath form (foam, wire, or grapevine)
- Cardstock or specialty paper in autumn shades (burgundy, copper, mustard, deep green)
- Metallic paper (gold, bronze, or rose gold for accents)
- Butterfly templates or a butterfly paper punch
- Scissors
- Hot glue gun & glue sticks
- Floral wire (optional, for raised butterflies)
- Ribbon for hanging
Step-by-Step Instructions:
Prepare the Butterflies Use a template, punch, or freehand to cut butterfly shapes from your chosen paper. Vary the sizes for more natural movement. Fold for Dimension Lightly fold the wings upward along the body line so each butterfly has a 3D effect rather than lying flat. Arrange the Layout Before gluing, cluster butterflies on your wreath form in sections. For a fuller look, layer small butterflies on top of larger ones.
Attach the Butterflies Use hot glue to secure butterflies directly to the wreath base. For a floating effect, glue butterflies onto small pieces of floral wire and insert them so they hover slightly above the surface. Accent with a metallic butterfly or two for shimmer. Finish with a coordinating ribbon for hanging.
The finished wreath feels magical and airy, like a swirl of autumn butterflies gathered at your door—a perfect blend of seasonal color and playful charm.
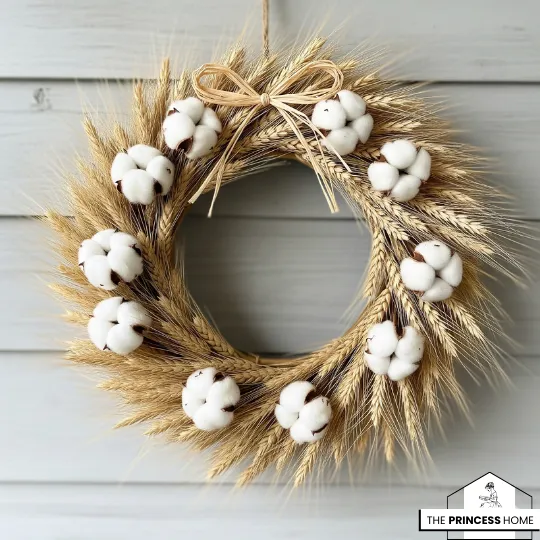
19. Wheat & Cotton Wreath
For a natural and earthy design, combine wheat stalks with fluffy cotton bolls to create a simple yet striking wreath. The contrast between the soft cotton and the structured wheat adds texture and interest, while the neutral colors make it versatile enough to complement any front door. This wreath is perfect for homes with a modern farmhouse or country style.
How you can make a Wheat &Cotton Wreath step by step:
🛠 Materials You’ll Need:
- Wreath form (grapevine or wire works best)
- Dried wheat stalks
- Cotton stems or individual cotton bolls
- Floral wire or hot glue gun
- Wire cutters
- Burlap or linen ribbon (optional, for hanging or accent)
Step-by-Step Instructions:
Prepare the Base Start with a grapevine or wire wreath form, which provides a sturdy and rustic foundation. Layer the Wheat Bundle small groups of wheat stalks and secure them with floral wire. Attach these bundles around the wreath form, slightly overlapping to create a full, textured effect. Add the Cotton Insert cotton bolls between the wheat bundles, spacing them evenly around the wreath. Use hot glue or wire to secure them in place.
Balance the Design Alternate clusters of cotton and wheat for a natural flow. You can keep it symmetrical or create an asymmetrical design with more cotton on one side for a modern touch. Finish with Ribbon (Optional) Add a burlap or linen ribbon bow at the bottom or top for extra farmhouse charm, or leave it minimal for a sleek, rustic look.
The result is a warm, harvest-inspired wreath that feels timeless, cozy, and perfectly suited for farmhouse fall decor.
Here are some frequently asked questions related to the article :
1. Can I make these wreaths at home, or do I need to buy them?
Many of these wreath ideas can be DIY projects with basic crafting supplies. You can source materials from craft stores or repurpose items you already have at home, like fabric, old books, or natural elements. For more intricate designs like macramé or leather leaf wreaths, you might need specific skills or instructions, but they are still manageable with practice. Alternatively, you can purchase similar designs from artisan markets or online stores.
2. How long will a DIY wreath last?
The longevity of a DIY wreath depends on the materials used. Wreaths made from preserved or faux materials like felt, leather, or dried herbs can last for several seasons if stored properly. If you’re using fresh or natural elements like real flowers, leaves, or fruits, expect them to last for a few weeks, depending on the weather and exposure.
3. Are these unusual wreath ideas suitable for all types of doors?
Yes! These wreaths can be displayed on wooden, metal, or glass doors. However, if your door gets direct sunlight or harsh weather conditions, consider using more durable materials like faux foliage or treated wood slices to ensure the wreath lasts longer without damage.
4. How do I hang a wreath without damaging my door?
You can use adhesive hooks, over-the-door wreath hangers, or ribbon to avoid damaging your door. Adhesive hooks are ideal for lightweight wreaths and can be easily removed. For heavier wreaths, an over-the-door hanger works well. If you’d like a seamless look, hang the wreath with a ribbon looped over the top of the door and secured from the other side.
5. Can these wreaths be customized for other seasons?
Absolutely! Many of these designs can be adapted for other seasons by swapping out certain elements. For example, the feather and foliage wreath could use spring flowers instead of autumn leaves, or the pom-pom wreath could feature bright summer colors instead of fall hues.
6. What’s the best way to store a wreath when the season is over?
To store your wreath, place it in a large, protective box or wreath storage container to prevent it from getting crushed. Avoid direct sunlight and humidity, as these can damage the materials. For wreaths with delicate features like dried flowers or feathers, wrap them in tissue paper for extra protection.
7. Are there eco-friendly materials I can use for a fall wreath ideas ?
Yes! Many of the ideas, like the corn husk wreath, driftwood and shell wreath, and wheat and cotton wreath, already use natural or upcycled materials. You can also source eco-friendly alternatives like organic cotton, natural jute, or sustainably sourced wood for other wreaths. Repurposing old materials like denim or fabric from clothing is another great eco-friendly option.
8. Can I add lights or other accessories to these wreaths?
Yes! Battery-operated LED lights, small ornaments, or bells can be added to any wreath for extra decoration. Just be mindful of the overall weight if you’re using heavier accessories. Ensure that the battery pack for lights is discreetly hidden behind the wreath or within the materials.
9. Where else can I use these wreaths besides the front door?
These wreaths can be used in other places around your home too! Try hanging them over a mantel, on an interior door, as part of a gallery wall, or even as a centerpiece for your dining table or coffee table with a candle in the middle.
10. What is the best size for a front door wreath?
Most front door wreaths are between 18 and 24 inches in diameter. However, the ideal size depends on the size of your door. For a standard door, 20 to 24 inches works well. For double doors or larger entryways, you might want to go bigger, or hang two matching wreaths side by side.
See more fall tips & Ideas
The princess home on Pinterest
