
As the air turns crisp, leaves paint the world in amber and gold. Your front door is the perfect spot to celebrate fall. A wreath is more than decoration—it’s a warm welcome. It invites family, friends, and neighbors to enjoy the season. Whether you love rustic charm, modern simplicity, or bright colors, these 19 fall wreath ideas will inspire you. Create a front door look that is unique and unforgettable.
1. Dried Citrus & Herb Wreath
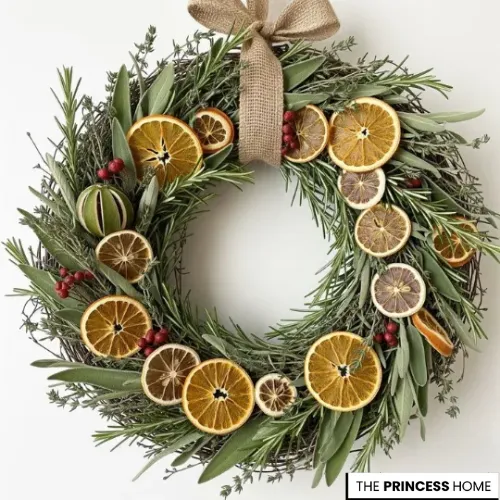
This natural wreath combines fresh greenery like rosemary and sage with dried citrus slices and small red berries. It creates a rustic yet bright look. The mix of herbs and dried fruit adds texture, color, and aroma. It makes a beautiful accent for a front door or wall. The result is warm, earthy, and welcoming décor. Perfect for late autumn through winter.
2. Succulent & Moss Wreath
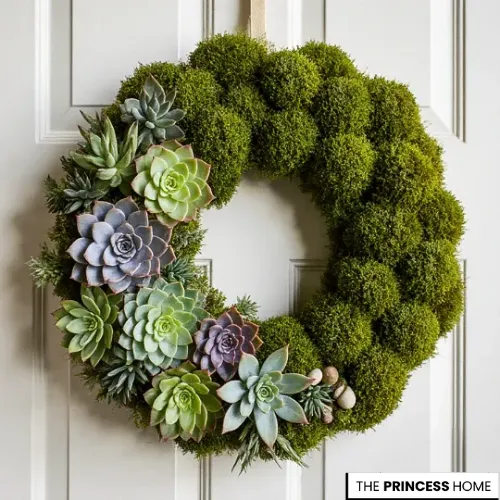
This stunning wreath features vibrant green cushion moss as a soft, lush base. One side is accented with live or faux succulents in different colors and shapes. The result is a modern, asymmetrical focal point. It’s fresh, long-lasting, and low-maintenance. Perfect for adding an earthy, botanical feel to any door or wall.
3. Feather & Foliage Wreath
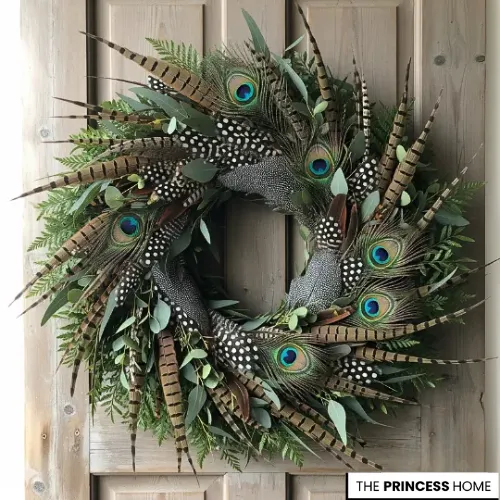
This dramatic wreath features mixed greenery, including ferns and eucalyptus, as a rich, natural base. Layered feathers, like spotted guinea fowl and iridescent peacock, add texture and depth. The result is a sophisticated, nature-inspired statement piece. It brings a luxurious, unexpected touch to any door.
4. Upcycled Denim Wreath
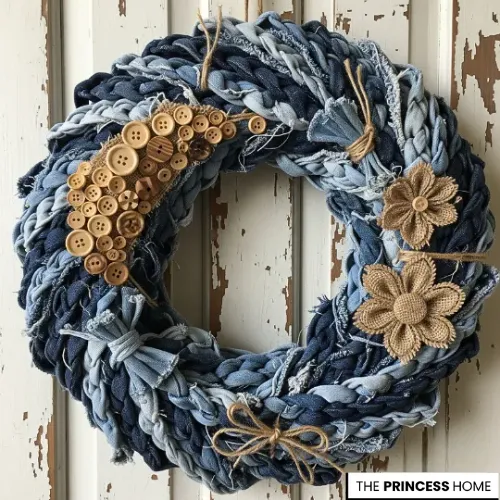
This playful wreath is made by braiding and wrapping recycled denim strips in different shades of blue. The distressed denim creates a cool, shabby-chic look. Wooden buttons and burlap flowers add a rustic, handcrafted touch. It’s perfect for casual, cozy décor.
5. Macramé Wreath
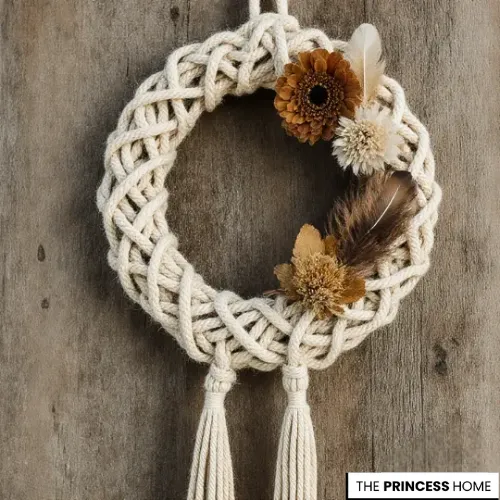
This charming wreath is made from thick, natural rope using a macramé knotting technique. The woven texture and intricate knots create a cozy, modern-bohemian look. Accents of dried flowers and soft feathers add an earthy, organic touch. The crisp white cord contrasts beautifully with the natural elements.
6. Corn Husk Wreath

This rustic wreath is made from dried corn husks for a shaggy, sun-bleached texture. Small decorative corn cobs in gold and reddish-brown add a harvest feel. The result is a full, earthy wreath perfect for Thanksgiving or autumn décor. It celebrates the season’s natural bounty beautifully.
7. Book Page Wreath
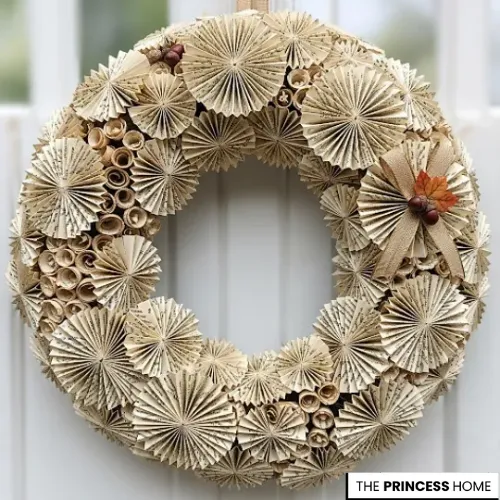
This handcrafted wreath is made by folding vintage book pages into paper rosettes and spirals. The aged pages create a layered, textured look. A burlap ribbon and small leaf add a simple, charming accent. Perfect for a book lover’s home, it’s a unique, intellectual décor piece.
8. Felt Flower Wreath
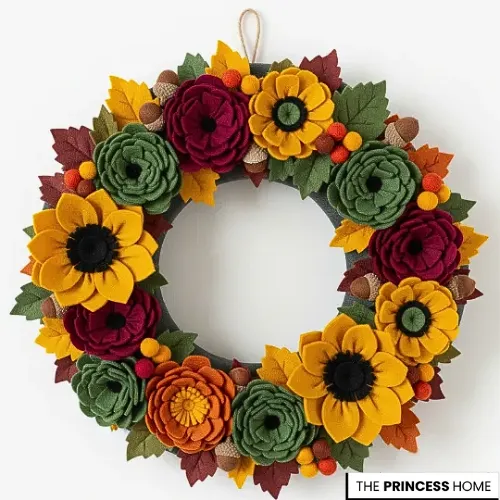
This eye-catching wreath is made from soft felt, shaped into layered flowers and foliage. A warm autumn palette of reds, mustard yellows, oranges, and olive greens adds seasonal color. Felt acorns and berries provide charming details. The result is a cozy, handmade decoration perfect for fall.
9. Burlap & Lace Wreath
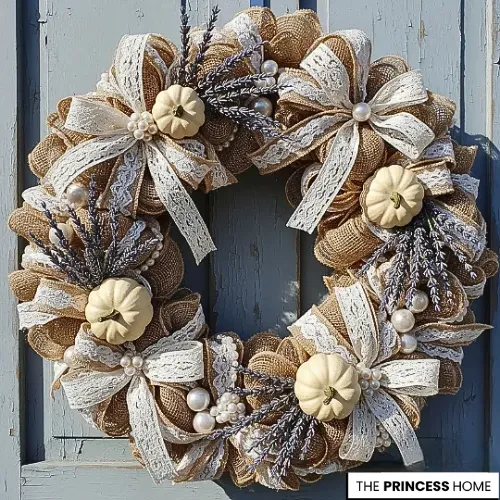
This ornate wreath is made from layered burlap mesh for a full, rustic base. White lace ribbon adds a delicate, vintage touch. Small white pumpkins, faux pearls, and dried lavender create a romantic, farmhouse-chic look. It’s a charming, elegant decoration for fall.
10. Driftwood & Shell Wreath
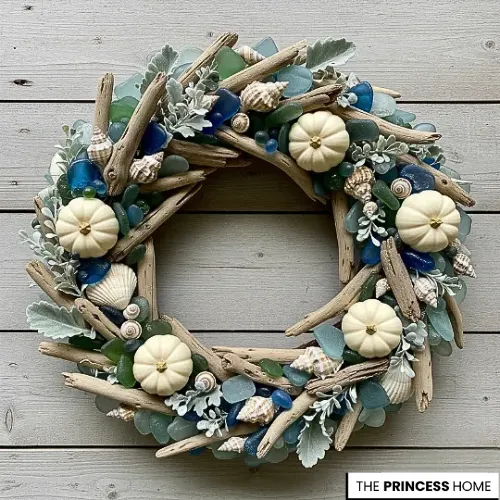
This unique wreath features weathered driftwood arranged in a natural circle. Blue and green sea glass and seashells fill the spaces, adding texture. Small white pumpkins and gray-green foliage bring a coastal autumn vibe. The result is a beach-inspired fall decoration.
11. Faux Leather Leaf Wreath
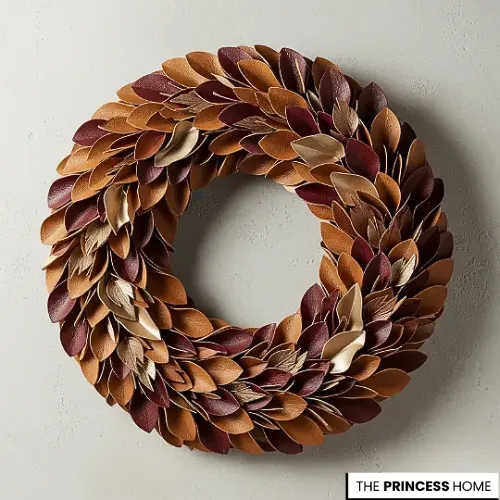
This striking wreath is made from layered faux leather leaves for a dense, textured look. Rich autumn colors—burgundy, copper, and metallic gold—add sophistication. The result is a warm, durable statement piece, perfect for indoor fall décor.
12. Copper & Wheat Wreath
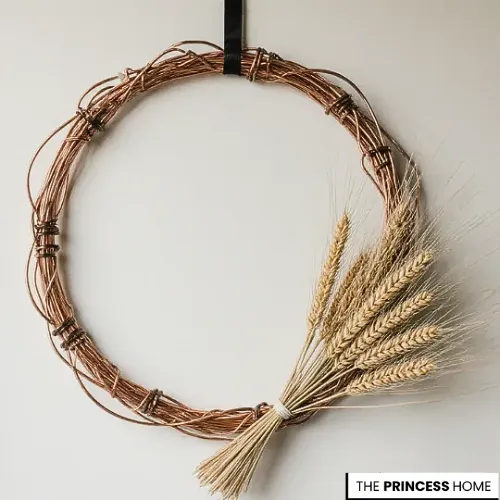
This modern wreath is made from coiled copper wire, forming a textured, rustic ring. A small bundle of dried wheat stalks adds a harvest-inspired accent. The result is a clean, minimalist piece that subtly celebrates autumn.
13. Wreath of Elegance
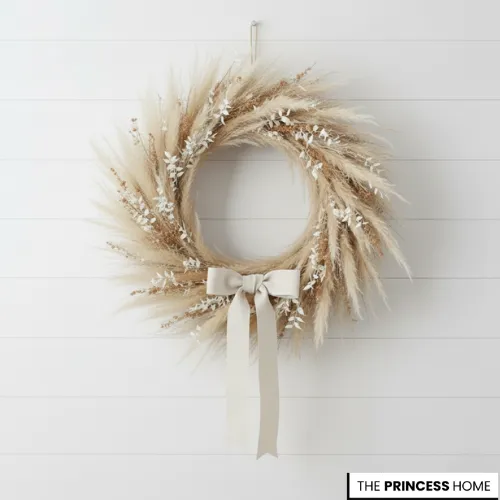
This beautiful wreath, crafted primarily from pampas grass, brings a soft, natural, and bohemian-inspired elegance to the space. Its fluffy, neutral tones offer a subtle texture that contrasts beautifully against the crisp, white shiplap wall. The understated creamy bow and delicate white floral accents complete the design, adding a charming, sophisticated touch to this lovely piece of home décor.
14. Wood Slice Wreath
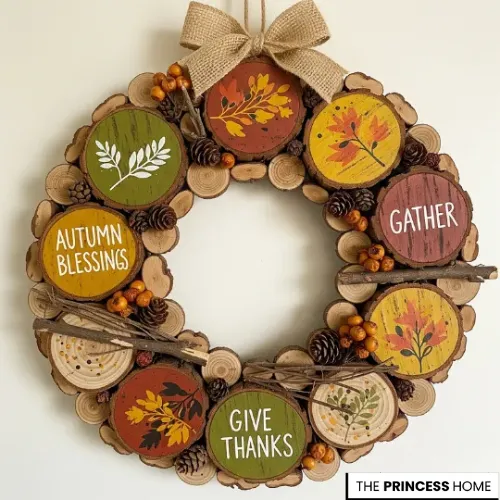
This charming wreath uses a base of natural wood slices with bark edges for a rustic look. Painted slices feature fall words like “GATHER” and “GIVE THANKS” with leaf illustrations. Pinecones, branches, and orange berries add natural accents, finished with a burlap ribbon. The result is a warm, welcoming harvest decoration.
15. Leather & Gold Wreath
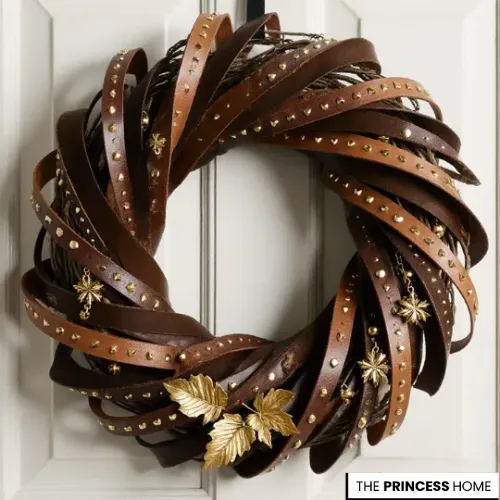
This striking wreath twists leather belt strips in various shades of brown around a central frame. Brass studs introduce an edgy, rocker-chic touch. Gold leaves and charms complete the design, creating a bold, luxurious decoration perfect for fall or year-round.
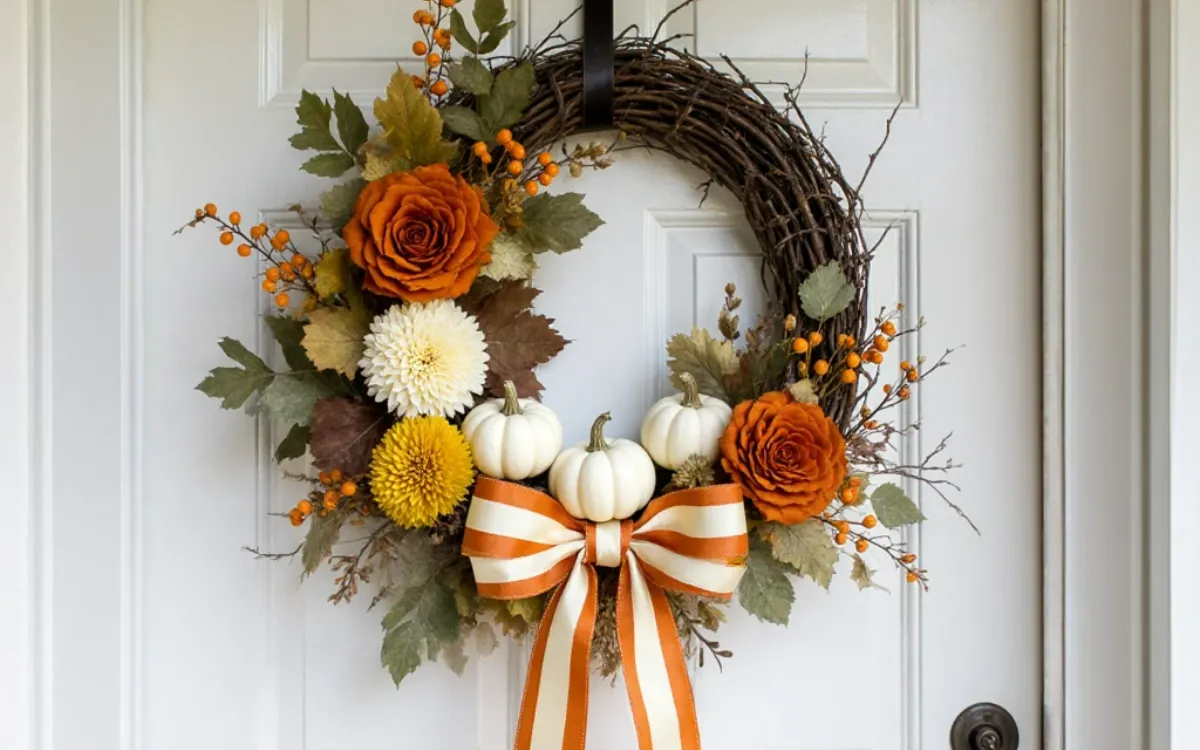
16. Harvest Rose & Pumpkin Wreath
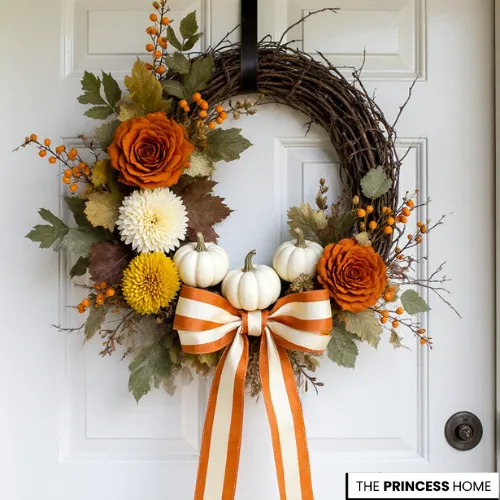
This beautiful wreath displays a natural grapevine base for a rustic look. Large faux roses and mums in deep orange and creamy white combine with vibrant leaves and orange berries. Three small white pumpkins and a wide striped bow finish the design. It creates a sophisticated, welcoming decoration for fall.
17. Vintage Brooch Wreath
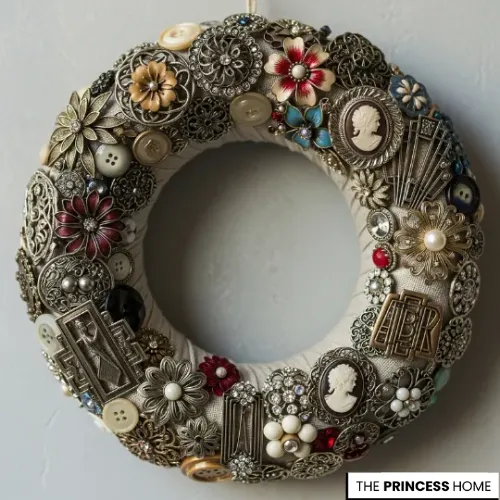
This unique wreath displays a thick fabric-wrapped ring as its base. Vintage buttons, brooches, cameos, and metal ornaments layer to create texture and sparkle. The design celebrates antique treasures, offering a personal, glamorous, and nostalgic decoration.
18. Paper Butterfly Wreath
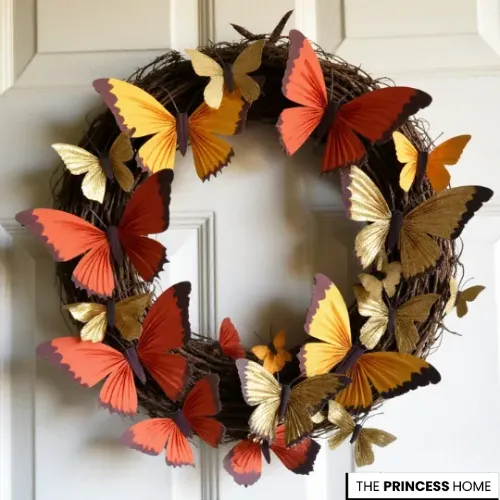
This whimsical wreath features a rustic grapevine base for a natural look. Paper butterflies in burnt orange, mustard yellow, and gold add color and movement. The result is a lighthearted, vibrant decoration perfect for spring, summer, or early autumn.
19. Wheat & Cotton Wreath
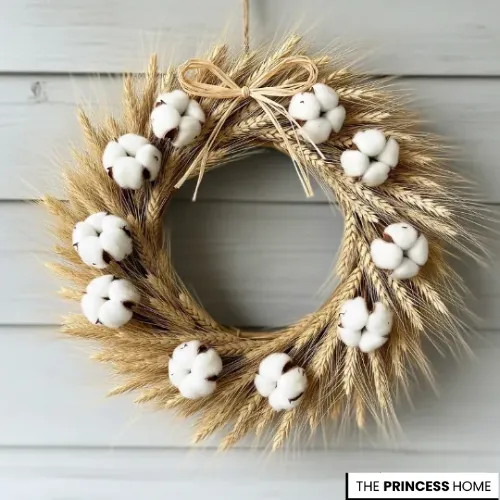
This rustic wreath features dried golden wheat stalks arranged in a sunburst pattern. White cotton bolls contrast with the wheat, adding a cozy farmhouse look. A simple raffia bow completes the design. It brings a warm, earthy touch, perfect for the harvest season.
Here are some frequently asked questions related to the article :
1. Can I make these wreaths at home, or do I need to buy them?
Many of these fall wreath ideas can be DIY projects using basic craft supplies. Use materials from craft stores or repurpose items at home, like fabric, old books, or natural elements. More intricate designs, like macramé or leather leaf wreaths, may need specific skills but are doable with practice. You can also find similar wreaths at artisan markets or online.
2. How long will a DIY wreath last?
The lifespan of a DIY wreath depends on its materials. Wreaths made from preserved or faux items—like felt, leather, or dried herbs—can last for several seasons if stored properly. Fresh elements, such as real flowers, leaves, or fruits, typically last a few weeks, depending on weather and exposure.
3. Are these unusual wreath ideas suitable for all types of doors?
These wreaths can be displayed on wooden, metal, or glass doors. For doors exposed to sunlight or harsh weather, use durable materials like faux foliage or treated wood slices. This helps your wreath last longer without damage.
4. How do I hang a wreath without damaging my door?
Use adhesive hooks, over-the-door hangers, or ribbon to hang wreaths without damaging your door. Adhesive hooks are best for lightweight wreaths. Heavier wreaths work well with an over-the-door hanger. For a seamless look, use a ribbon looped over the door and secured on the other side.
5. Can these wreaths be customized for other seasons?
Absolutely! Many wreath designs can be adapted for other seasons by swapping elements. Feather and foliage wreaths can use spring flowers instead of autumn leaves. Pom-pom wreaths can feature bright summer colors instead of fall hues.
6. What’s the best way to store a wreath when the season is over?
Store your wreath in a large box or wreath container to prevent crushing. Keep it away from direct sunlight and humidity to protect the materials. For delicate wreaths with dried flowers or feathers, wrap them in tissue paper for extra care.
7. Are there eco-friendly materials I can use for a fall wreath ideas ?
Yes! Many wreath ideas, like corn husk, driftwood and shell, or wheat and cotton wreaths, use natural or upcycled materials. You can also use eco-friendly options like organic cotton, natural jute, or sustainably sourced wood. Repurposing old denim or fabric is another green, creative choice.
The princess home on Pinterest


