

Decorate Pumpkins The Best Easy Ideas: Get ready to dive into the world of pumpkin decorating, where creativity knows no bounds! In this comprehensive guide, we’ll share a variety of unique and exciting ways to transform ordinary pumpkins into stunning works of art. Whether you’re preparing for Halloween, Thanksgiving, or simply want to embrace the fall spirit, This is a way to decorate pumpkins.
Sure, here are some ideas on how to decorate pumpkins:

1-Double-dipped

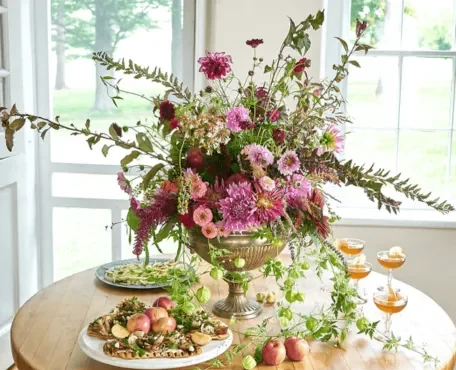
2-Floral Pumpkin
This is a way to decorate pumpkins ,Make This Gorgeous Floral Pumpkin So Your Home Will Feel Like Fall All Year. A pumpkin covered in beautiful dried blooms will make your fall decor pop.

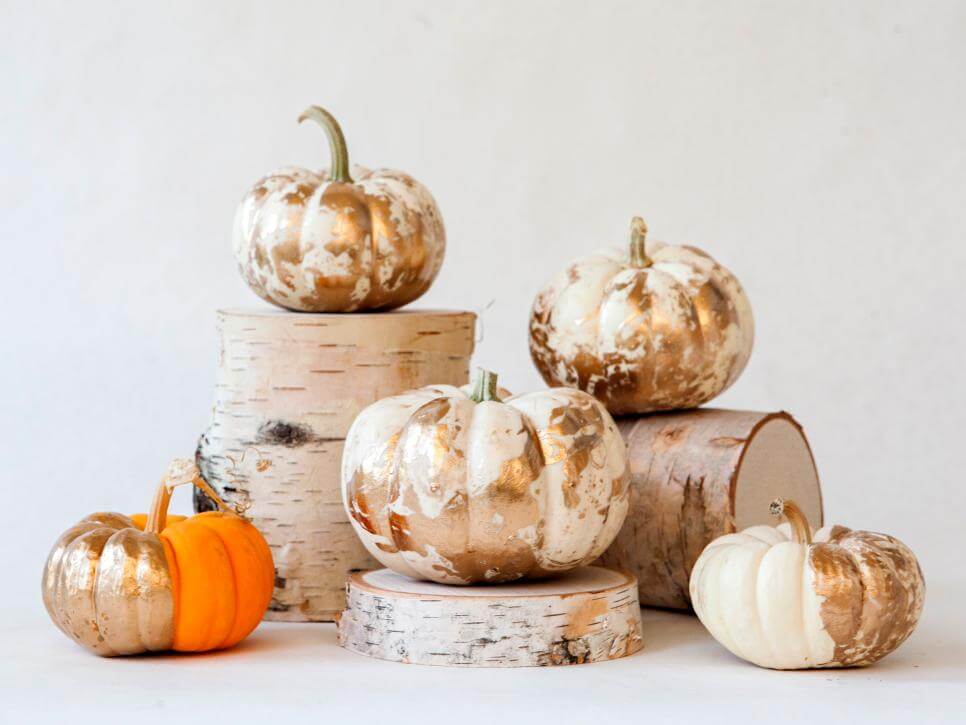
3-Splatter Paint Pumpkins
Keep it low key with a simple arrangement of white pumpkins splattered with gold paint, arrange atop wheat on your mantel. Paint the stems gold, too, for an extra sparkling touch

4-Paint Splatter Pumpkin
Get ready to get messy all in the name of art! These splatter pumpkins will be so much fun to make.

5-White-Washed Pumpkin
If you’ve got a beachy home, these pumpkins will bring some fall style while complementing your aesthetic.

6-METALLIC PUMPKINS
Skip the usual autumn color palettes and recreate these unique metallic pumpkins from Taryn Whiteaker. All you need are a few shimmery paint options and some pumpkins to decorate (real or faux!).

7-Copper Striped Pumpkins
Apply strips of copper tape or use copper acrylic paint for a simple way to dress up no-carve pumpkins in seconds.

8-Cozy Yarn Pumpkin
Who said Halloween pumpkins couldn’t be stylish? Give faux or plastic pumpkins a cozy upgrade with the visual warmth and texture of chunky wool yarn.

9-Corn Husk Pumpkin
Here’s an easy way to give your pumpkin a new texture: Cover it in corn husks. You can use floral foam for a base, as the blog Paint Me Pink did here, or consider attaching them to a real or craft pumpkin.

10-Collage Pumpkin
This collage pumpkin is adorable. If you use a faux pumpkin, you can display it every year. Bonus: Using black-and-white photos will give it a chic vintage vibe that just happens to go with your Halloween decor.

11-Toilet Paper Pumpkins
This easy fall project is super easy and fun to make! No sewing or skills are required.

12-Gold Botanical
For elevated decor pieces to place around your mantel or vanity, use a gold pen paint maker to design intricate patterns on your mini white pumpkins.

13-Grain Sack Pumpkins
Show your stripes! Strips of striped ribbon adhered with Mod Podge give white Lumina pumpkins the farmhouse flair of the dependable nubby fabric.

14-Painted Pumpkin Succulents
Pastel pumpkins with real succulents nestled inside .Succulents can sometimes be thought of as just a plant for the warmer months, but it’s so easy to incorporate them throughout all four seasons.

15-Copper Painted Pumpkins
Deck out the kitchen with these simple copper painted pumpkins that are sure to draw attention to your copper collection.

16-Stencil Painted Pumpkin
We’ve brought old-school country to the pumpkin! Get your paint pens out and get drawing.
To make: Lightly draw a stencil pattern around the center of a medium-size white pumpkin. Use black, orange, and yellow paint pens to cover drawing.

17-Whitewash Pumpkin
This elegant and super simple pumpkin looks antiqued with just a hint of off-white paint. Use a flat craft brush and off-white acrylic paint to whitewash a Jarrahdale pumpkin, allowing the paint to streak and not fully cover the pumpkin.

18-Address Numbers Pumpkin
Let revelers know they’re at the right address by emblazoning your house number—and state—on pumpkins. Mark your location on a decal of your state by punching a star-shaped hole. Then apply the decal and number stickers to the pumpkins, paint, and remove the adhesive symbols when dry.

19-Use Washi Tape
Washi Tape is fairly inexpensive and is an easy, customizable way to pretty up your pumpkins. Metallic washi tape is the way to go as it will really add some shine to your pumpkins, and will certainly catch a few eyes.

20- Leopard Print Pumpkin
Tutorial for how to make a DIY leopard print pumpkin without any painting required. The use of temporary tattoo paper makes for an easy and fun autumn project.

21- Mud Cloth Pumpkins
Pumpkins are a great low commitment way to try out trends or designs for the season, and this particular project was inspired by mud cloth!

22-Coastal Beach Inspired Pumpkins
These sand covered pumpkins are EASY to make and perfect for adding to a coastal fall decor display! So simple that even kids can help.

23-Chalkboard Word Find Pumpkin
Paint a pumpkin with chalkboard paint and add letters to create your own word find gourd! And of course, the chalk is erasable.

24- Rainbow Pumpkins

25-Rainbow Painted Pumpkins
No need to venture somewhere over the rainbow for pumpkin inspiration. Bring the look to your own front porch with an assortment of bright hues lining the stairs.

26-Book Page-Covered Pumpkins
Put your stash if vintage Nancy Drew books to good use. Start by copying pages from your favorite Nancy Drew or other scary books. Tear copies into strip and adhere to pumpkins with Mod Podge.

27-Distressed pumpkins
If you would describe your aesthetic as rustic, this is the pumpkin decorating idea for you. Cover a faux pumpkin in a layer of tacky glue and then apply a layer of paint. Once the paint dries, crackles will automatically appear. To add dimension, add watered-down brown paint and real branch pieces as stems.

28-Lace pumpkin
These decoupaged lace pumpkins can work as a fall centerpiece—or even autumn wedding decor. All you have to do is cover the pumpkin with overlapping strips of lace, then layer that with the glue.

29-Gold Geo No-Carve Pumpkins
To make these simply beautiful pumpkins, all you’ll need is a gold paint pen!

30-Moth Decal Pumpkins
The secret to these moth-adorned marvels? Weather-resistant vinyl decals. Show them to their best advantage against white pumpkins: Use a foam brush to cover each pumpkin with two coats of acrylic paint, allowing 30 minutes of drying time per coat, before applying decals.

31-Yarn Ball Pumpkins
Wrap a pumpkin with bulky yarn, overlapping the yarn to keep it in place, and covering as much as desired. Thread knitting needles through the yarn for a fitting finishing touch.

32-Woody Wagoneer Pumpkin
Trace the Wagoneer template on plaid fabric, scaling up or down as necessary, and cut out; attach to a pumpkin with small map tacks. Cut the wood panel from wood grain-patterned Duck Tape, and attach to the wagon. Use hot-glue to attach silver cordingto the wagon to outline the windows and wood panel. Glue a small spiral of cording to create the gas cap and a zigzag to create the bumpers. Hot-glue small wood slices for the wheels and small twigs to the roof to create the roof rack. Top with a toy canoe and oars.

33-Barn Quilt Pumpkins
Start with a white pumpkin, such as a “Lumina.” Cut out the design from our template to create a stencil of desired quilt pattern. Tape the stencil to the pumpkin and use a foam stencil paintbrush and acrylic paint to create the pattern. Repeat as desired. Take note: You don’t have to put your pumpkins out to pasture once Halloween is over. Display your handiwork year after year with artificial, carvable pumpkins.

34-Paint by Numbers Pumpkins
Because these retro relics often feature fall scenery—tree-lined trails, babbling brooks—you can find them gracing the heart-pine paneling in plenty a cabin. To create the ones you see at left, photocopy your favorite works of art (or simply Google “vintage paint by numbers” and print your favorite scenes, scaling them up or down as necessary). Cut paper printouts into half-inch strips, and attach to white pumpkins using Mod Podge. (Line up the image as best you can, taking heart in the fact that some imperfection adds charm.) Attach twig “frames” with hot-glue.

35-Preserved Flower Pumpkins
For a fun spin on florals, try out preserved flowers on your pumpkins. Arrange the flowers in a whimsical pattern and attach them to the pumpkin with a hot glue gun.

36-Pressed Flowers Pumpkin
Give your decor the loveliest upgrade with this design. To make, paint a small area of Modge Podge on the pumpkin surface, large enough to fit your flower or leaf. Using tweezers, carefully place the flower onto the Modge Podge. Then, use the brush with a little Modge Podge to smooth out the petals of the flower/leaf. Let it dry completely and repeat all over the surface of the pumpkin. Once dry, paint another layer or two of Modge Podge on top of the flowers and leaves to seal. Let dry for several hours to fully cure.

37-Decoupage Leaf Pumpkin
This is a way to decorate pumpkins, Paper leaves encircling a white pumpkin make a graphic statement. Trace fallen leaves onto orange, yellow, and dark red tissue paper; cut tracings out and stick them to pumpkin using decoupage glue. With a flat-head bristle brush, push from leaves’ outer edges toward the centers to pucker paper slightly and create “veins”; let dry. Brush a thin layer of glue over pumpkin.
38-Gold Marbled Pumpkin
Add a touch of glam to your fall decor with these DIY gold-marbled pumpkins. You will need liquid gilding, a small disposable container, a Popsicle stick or straw and wax paper. Fill the container with about 3 inches of water. Dip the Popsicle stick into the gilding and then drop drips of gilding onto the top of the water; some will sink but most will float. After you have about 20 percent of the surface covered, swirl the water and gilding around with the stick. Then carefully (and quickly) dip your pumpkin into the water and right back out again and place on wax paper to dry overnight. You can do the entire pumpkin or just half — the marbling look will always be different depending on the amount of gilding in the water. You can achieve a solid gold look by adding more gilding to the water.
No matter how you choose to decorate your pumpkins, have fun and let your creativity shine!
Here are some additional tips for decorating pumpkins:
- Start by cleaning the pumpkin and removing any blemishes.
- If you are carving the pumpkin, use a sharp knife and be careful not to cut yourself.
- If you are using paint, make sure to use acrylic paint that is specifically designed for pumpkins.
- If you are using a stencil, be sure to apply the paint evenly so that the design does not bleed.
- If you are using string art, be sure to use a strong thread or yarn that will not break easily.
- If you are using decoupage, be sure to use a decoupage medium that is specifically designed for pumpkins.
- If you are using pom-poms, be sure to use a hot glue gun to attach them to the pumpkin.
- If you are using fabric, be sure to use a fabric glue that is specifically designed for pumpkins.
- If you are using stickers, be sure to apply them to a clean and dry surface.
I hope these ideas help you create beautiful and festive pumpkins for your Halloween celebration!

