

Remodeling your kitchen is an exciting endeavor that can breathe new life into one of the most important rooms in your home. Whether you’re looking to update outdated features, improve functionality, or simply give your kitchen a fresh new look, a remodel can transform the heart of your home into a space that reflects your style and meets your needs.
Whether you’re looking to update outdated features, improve functionality, or simply give your kitchen a fresh new look, a remodel can transform the heart of your home into a space that reflects your style and meets your needs.
In this comprehensive guide, we’ll walk you through the steps to remodel your kitchen and achieve stunning results that make it look like new.

1. Set Your Budget:
Determine how much you’re willing to spend on the remodel. This will guide your decisions throughout the process. Setting your budget is the first crucial step in remodeling your kitchen.
Here’s how you can effectively set your budget:
1.Assess Your Finances:
Take a close look at your finances to determine how much you can realistically afford to spend on your kitchen remodel. Consider your savings, available credit, and any other sources of funding.
2.Research Costs:
Research the average costs of kitchen remodeling projects in your area. This will give you a ballpark figure to work with and help you understand what you can expect to pay for materials, labor, and other expenses.
3.Prioritize Needs vs. Wants:
Make a list of the features and improvements you want for your new kitchen, and categorize them as needs or wants. Focus on prioritizing the needs first, such as fixing any structural issues or replacing outdated appliances.
4.Get Multiple Quotes:
Reach out to contractors, kitchen designers, and other professionals to get multiple quotes for your project. Compare these quotes carefully to ensure you’re getting a fair price for the work.
5.Factor in Contingencies:
It’s important to budget for unexpected expenses that may arise during the remodel. Plan to set aside a contingency fund of around 10-20% of your total budget to cover any unforeseen costs or changes to the project scope.
6.Consider DIY vs. Professional Labor:
Determine which aspects of the remodel you can realistically handle yourself and which will require professional help. DIY projects can help save money on labor costs, but make sure you have the necessary skills and time to complete them properly.
7.Be Realistic:
While it’s natural to want the kitchen of your dreams, be realistic about what you can afford within your budget constraints. Look for cost-effective alternatives to high-end materials or features that may stretch your budget too thin.
8.Plan for Long-Term Value:
Consider how your kitchen remodel will impact the resale value of your home. Focus on investing in upgrades that will add value and appeal to potential buyers if you plan to sell in the future.
9.Track Expenses:
Keep track of all your expenses throughout the remodeling process to ensure you stay within your budget. Use spreadsheets or budgeting apps to monitor spending and make adjustments as needed.
10.Review and Adjust:
Periodically review your budget throughout the remodeling process and make adjustments as necessary. Stay flexible and be prepared to make compromises if unexpected costs arise.

2.Plan the Layout:
Consider the current layout of your kitchen and whether it works for you. Think about factors like workflow, storage, and seating areas. You may want to consult with a kitchen designer or use online tools to help with this step. Planning the layout of your kitchen is essential for a successful remodel.
Here’s how you can approach this step:
1.Assess Current Layout:
Start by evaluating the current layout of your kitchen. Consider the placement of appliances, cabinets, and countertops, as well as the flow of traffic in the space.
2.Identify Pain Points:
Determine what aspects of the current layout aren’t working for you. This could include inefficient workflow, inadequate storage, or a lack of seating areas.
3.Consider Workflow:
Think about how you use your kitchen on a daily basis. Design the layout to optimize workflow, with designated zones for cooking, prepping, and cleaning. Ensure that the placement of appliances and work surfaces allows for smooth and efficient movement between tasks.
4.Maximize Storage:
Assess your storage needs and incorporate solutions to maximize storage space. This could include installing additional cabinets, drawers, or pantry organizers. Consider utilizing vertical space with tall cabinets or shelving to make the most of limited square footage.
5.Plan for Seating:
If you want to incorporate seating areas into your kitchen, consider options like a breakfast bar, island with bar stools, or a cozy dining nook. Ensure that there is enough space around seating areas for comfortable movement and interaction.
6.Consult with a Designer:
If you’re struggling to come up with an effective layout, consider consulting with a kitchen designer. They can provide expert advice and insights to help you optimize your space and achieve your desired functionality and aesthetic.
7.Use Online Tools:
Take advantage of online kitchen design tools and software to visualize different layout options. These tools allow you to experiment with different configurations, appliance placements, and storage solutions to find the best fit for your needs.
8.Consider Traffic Flow:
Pay attention to the traffic flow in your kitchen and ensure that there are clear pathways between the major work zones. Avoid placing obstacles or obstructions that could impede movement and create bottlenecks.
9.Think About Safety:
Keep safety in mind when planning your layout. Ensure that there is adequate space around appliances, especially heat-producing ones like stoves and ovens. Minimize the risk of accidents by avoiding cramped or cluttered areas.
1o.Review and Refine:
Once you’ve come up with a preliminary layout, review it carefully and make any necessary refinements. Consider factors like ergonomics, aesthetics, and practicality to create a final layout that meets your needs and preferences.
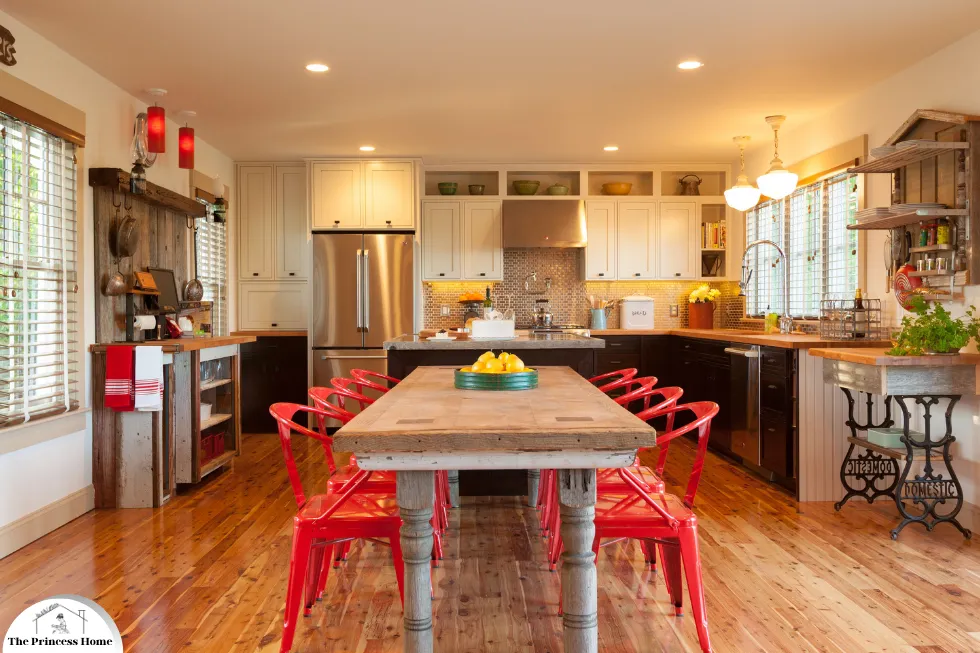
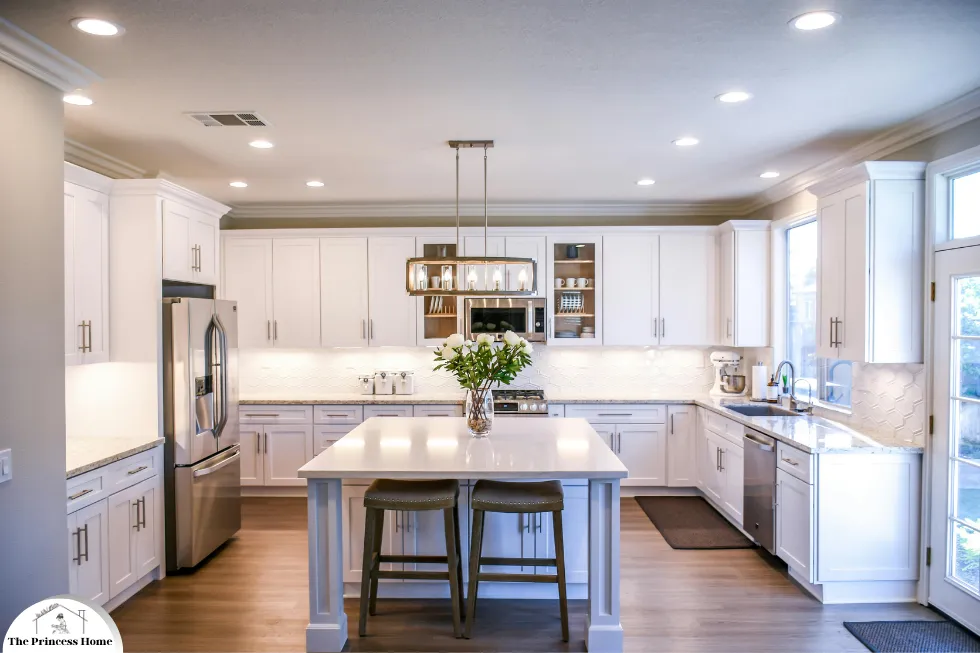
3.Choose Your Style:
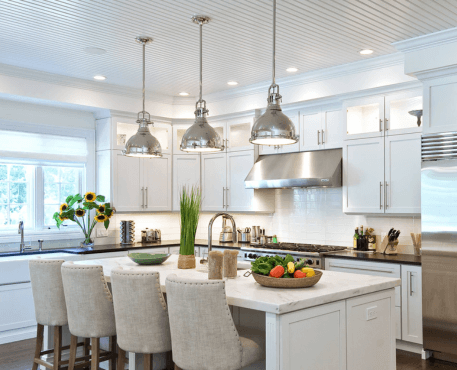
Decide on the aesthetic you want for your new kitchen. Whether it’s modern, traditional, farmhouse, or something else, choose elements like cabinets, countertops, backsplash, and flooring that reflect your style. Explore Different Styles: Begin by exploring different kitchen styles to determine which one resonates with you. Some popular styles include: Choosing the style for your kitchen remodel is a crucial step in creating a space that reflects your taste and personality.
Here’s how to decide on the aesthetic for your new kitchen:
1.Gather Inspiration:
Start by gathering inspiration from various sources such as home decor magazines, websites like Pinterest or Houzz, and social media platforms like Instagram. Save images of kitchens that resonate with you and take note of common elements or themes.
2.Identify Your Preferences:
Consider your personal style preferences and lifestyle needs. Do you prefer clean lines and minimalist designs, or are you drawn to cozy, rustic spaces? Think about the colors, textures, and materials that appeal to you the most.
3.Explore Different Styles:
Familiarize yourself with different kitchen styles and aesthetics to help narrow down your choices. Some popular styles include:
Modern: Characterized by sleek, clean lines, minimalist design, and a focus on functionality. Choose materials like stainless steel, glass, and concrete for a contemporary look.
Traditional: Embraces classic elements such as ornate cabinetry, decorative molding, and rich wood finishes. Opt for timeless materials like granite or marble countertops and ceramic tile backsplashes.
Farmhouse: Evokes a cozy, rustic charm with elements like farmhouse sinks, open shelving, and reclaimed wood accents. Choose warm, earthy tones and natural materials for a relaxed, inviting vibe.
Transitional: Combines elements of both traditional and contemporary styles for a balanced and versatile look. Mix classic features like shaker-style cabinets with modern finishes like brushed nickel hardware and quartz countertops.
4.Consider Your Home’s Architecture:
Take cues from the architecture and design style of your home when selecting the aesthetic for your kitchen. Aim for a cohesive look that complements the overall vibe of your home while still allowing your kitchen to stand out as a focal point.
5.Focus on Cohesion:
Aim for cohesion and consistency throughout your kitchen design by selecting elements that harmonize with one another. Choose complementary colors, materials, and finishes for cabinets, countertops, backsplashes, and flooring to create a cohesive and unified look.
6.Personalize with Accents:
Once you’ve chosen the main elements of your kitchen design, add personal touches and accents to infuse the space with your unique personality. Incorporate decorative accessories, artwork, and textiles that reflect your interests and style preferences.
7.Seek Professional Advice if Needed:
If you’re unsure about which style direction to take or how to achieve the look you want, consider consulting with a professional kitchen designer. They can offer expert advice and guidance to help bring your vision to life while ensuring functionality and practicality.

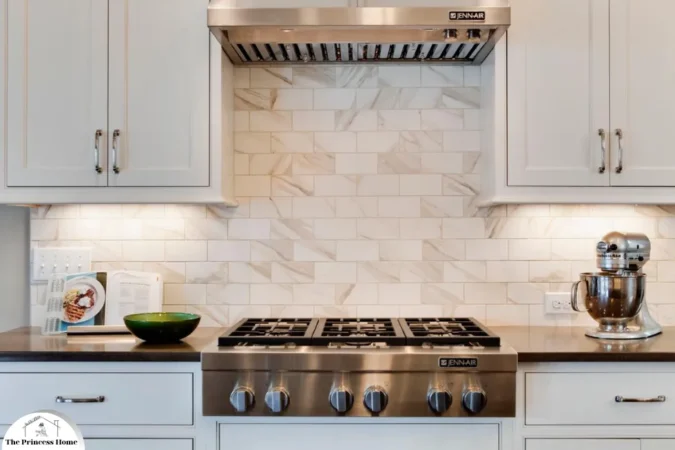
4.Select Materials:
Research and choose materials that fit your budget and style preferences. This includes cabinets, countertops, backsplash, flooring, and appliances. Consider factors like durability, maintenance, and resale value. Selecting the right materials for your kitchen remodel is crucial for achieving both the aesthetic and functional goals of your project.
Here’s how to go about it:
1.Cabinets:
Consider the style, color, and material of the cabinets that best fit your design aesthetic. Options include wood, laminate, stainless steel, or even glass. Pay attention to factors like durability, maintenance requirements, and cost when making your selection. Opt for high-quality construction and hardware to ensure longevity and functionality. Keep in mind the overall theme of your kitchen and choose cabinets that complement the style you’ve chosen.
2.Countertops:
Explore different countertop materials such as granite, quartz, marble, laminate, or concrete. Consider factors like durability, stain resistance, maintenance, and cost when choosing a countertop material. Select a color and pattern that complements your cabinets, backsplash, and flooring while also reflecting your personal style. Keep in mind the practicality of the material for your cooking and food preparation needs.
3.Backsplash:
Choose a backsplash material and design that adds visual interest to your kitchen while also protecting the walls from spills and splatters. Options include ceramic or porcelain tile, glass, natural stone, or even metal. Consider the ease of cleaning and maintenance, as well as how well the backsplash coordinates with your cabinets and countertops. Experiment with different patterns, colors, and textures to find the perfect complement to your overall design scheme.
4.Flooring:
Select flooring materials that are durable, easy to clean, and suitable for high-traffic areas like the kitchen. Popular options include hardwood, laminate, tile, vinyl, and engineered wood. Consider factors like moisture resistance, comfort underfoot, and compatibility with underfloor heating if desired. Choose a flooring color and finish that harmonizes with the rest of your kitchen’s design elements while also meeting your practical needs.
5.Appliances:
Invest in high-quality appliances that offer the features and functionality you need for your cooking and food storage requirements. Consider factors like energy efficiency, brand reputation, warranty coverage, and design aesthetics when choosing appliances. Coordinate the finish of your appliances with the overall style of your kitchen, whether it’s stainless steel, black, white, or custom paneling to match cabinetry. Take measurements carefully to ensure that appliances fit seamlessly into your kitchen layout.
6.Other Considerations:
Think about how the selected materials will impact the resale value of your home if that is a concern. Balance your style preferences with practical considerations such as budget, maintenance requirements, and durability. Don’t hesitate to seek advice from design professionals or visit showrooms to see and feel different materials in person before making your final selections.

5.Hire Professionals:
Depending on the complexity of the remodel, you may need to hire contractors, plumbers, electricians, and other professionals. Make sure to vet them carefully and get multiple quotes before making a decision. Hiring the right professionals for your kitchen remodel is crucial to ensure the project is completed safely, efficiently, and to your satisfaction.
Here’s how to go about it:
1.Assess Your Needs:
Determine what aspects of the remodel require professional expertise. This may include tasks such as demolition, plumbing, electrical work, cabinetry installation, countertop fabrication, flooring installation, and painting.
2.Research Contractors:
Start by researching reputable contractors, plumbers, electricians, and other professionals in your area. Ask for recommendations from friends, family, or neighbors who have recently completed similar projects. You can also check online reviews and ratings on websites like Yelp, Angie’s List, or Houzz.
3.Check Credentials:
Verify that the professionals you’re considering hiring are licensed, insured, and bonded. Check their credentials and certifications to ensure they have the necessary qualifications and experience to handle your project safely and effectively.
4.Get Multiple Quotes:
Reach out to several professionals and request detailed quotes for your project. Make sure the quotes include a breakdown of labor and material costs, as well as the estimated timeline for completion.
5.Review Portfolios:
Ask to see portfolios or examples of past projects completed by the professionals you’re considering hiring. This will give you a sense of their workmanship and style, and help you determine if they’re the right fit for your project.
6.Ask for References:
Request references from past clients and follow up with them to inquire about their experience working with the professionals. Ask about the quality of their work, communication, reliability, and whether they stayed within budget and timeline.
7.Meet in Person:
Schedule face-to-face meetings with potential professionals to discuss your project in detail. Use this opportunity to ask questions, clarify any concerns, and gauge their professionalism and communication style.
8.Check Contracts Carefully:
Once you’ve selected professionals for your project, review the contracts carefully before signing. Make sure all terms, scope of work, timelines, payment schedules, and warranties are clearly outlined and agreed upon.
9.Communicate Clearly:
Maintain open and clear communication with the professionals throughout the project. Regularly communicate your expectations, concerns, and any changes or adjustments to the plan.
10.Monitor Progress:
Stay involved in the remodeling process and regularly monitor the progress of the work. Address any issues or concerns promptly to ensure they’re resolved in a timely manner.
11.Final Inspection:
Once the remodel is complete, conduct a final inspection with the professionals to ensure all work has been completed to your satisfaction and meets the agreed-upon standards.

6.Demolition:
If you’re making significant changes to the layout or replacing existing features, you’ll need to demolish the old kitchen. Make sure to do this carefully to avoid damaging any structural elements. Demolition is a crucial step in a kitchen remodel, especially if you’re making significant changes to the layout or replacing existing features.
Here’s how to approach it safely and effectively:
1.Plan and Prepare:
Before starting the demolition, carefully plan out the scope of work and identify which parts of the kitchen need to be demolished. This may include removing cabinets, countertops, appliances, flooring, and any other fixtures or structures that are being replaced.
2.Turn off Utilities:
Begin by turning off the utilities to the kitchen, including electricity, gas, and water. This will ensure safety during the demolition process.
3.Protect Surrounding Areas:
Take steps to protect surrounding areas of the home from dust, debris, and damage. Use plastic sheeting to cover doorways and furniture, and consider laying down protective flooring covers.
4.Use Proper Safety Gear:
Wear appropriate safety gear, including gloves, safety goggles, a dust mask, and sturdy footwear, to protect yourself from injury and exposure to dust and debris.
5.Start with Removal of Fixtures:
Begin the demolition by removing fixtures and appliances from the kitchen. This may include disconnecting and removing sinks, faucets, range hoods, and appliances like refrigerators and dishwashers.
6.Remove Cabinets and Countertops:
Next, remove the cabinets and countertops. Start by unscrewing any hardware and fixtures, then carefully dismantle the cabinets and countertops from the walls and bases.
7.Take Down Walls if Necessary:
If you’re reconfiguring the layout of the kitchen and need to remove walls or partitions, proceed with caution. Consult with a structural engineer or contractor to determine which walls are load-bearing and how to safely remove them without compromising the structural integrity of the home.
8.Dispose of Debris Properly:
As you demolish the kitchen, be mindful of proper waste disposal. Rent a dumpster or arrange for a debris removal service to haul away the materials responsibly.
9.Inspect for Structural Damage:
Once the demolition is complete, inspect the space for any signs of structural damage or issues that need to be addressed before proceeding with the remodel. This may include water damage, mold, or deteriorated framing.
10.Clean Up:
Finally, thoroughly clean the space to remove dust, debris, and any remaining materials. Sweep and vacuum the floors, wipe down surfaces, and dispose of any remaining debris properly.
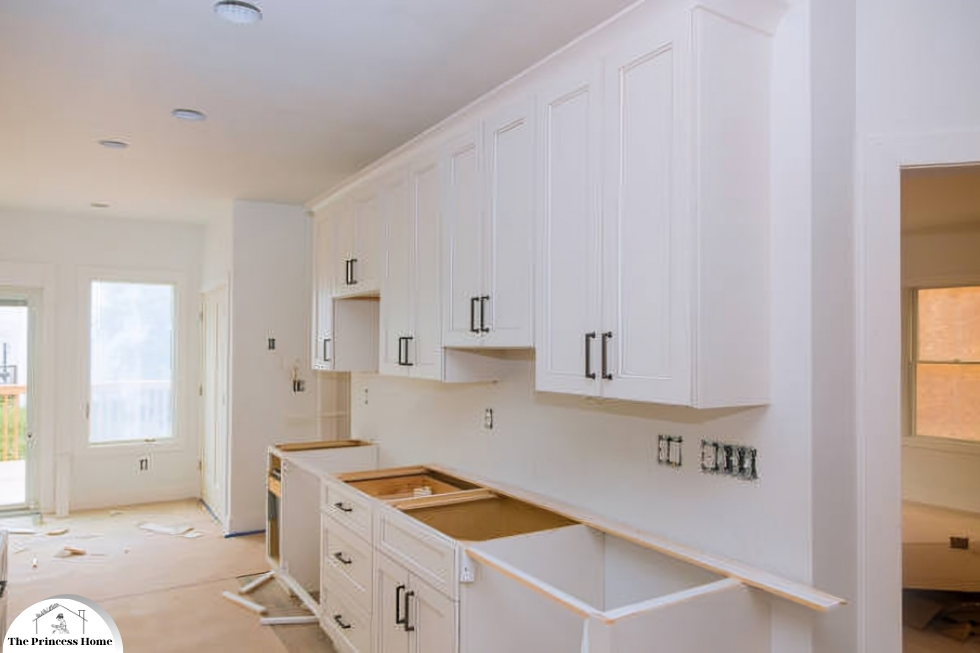
7.Install Cabinets & Countertops:
Once the old kitchen is cleared out, install the new cabinets and countertops according to your layout plan. Make sure everything is level and secure. Installing cabinets and countertops is a crucial phase of your kitchen remodel.
Here’s a step-by-step guide on how to do it effectively:
1.Prepare the Space:
Ensure that the area is clean and free of debris from the demolition phase. Check the walls and floors for any damage or unevenness that may need to be addressed before installation.
2.Measure and Plan:
Double-check your layout plan and measurements to ensure that the cabinets and countertops will fit properly in the designated spaces. Make any necessary adjustments or modifications before proceeding.
3.Install Cabinets:
1.Start by installing the upper cabinets first. Use a stud finder to locate and mark the wall studs where the cabinets will be anchored.
2.Secure the cabinets to the wall studs using screws, making sure they are level and plumb. Use shims if necessary to adjust for any unevenness in the walls. Install the lower cabinets next, starting from the corners and working your way outward.
3.Use a level to ensure that the cabinets are straight and even. Connect adjacent cabinets together using screws or brackets, following the manufacturer’s instructions.
4.Install Countertops:
1.Begin by placing the countertop slabs or sections onto the base cabinets.
2. Ensure that they are positioned correctly and aligned with the edges of the cabinets. Use a level to check for any unevenness or gaps between the countertop and cabinets.
3. Make any necessary adjustments by shimming or sanding down the cabinets as needed. Secure the countertops to the cabinets using screws or adhesive, following the manufacturer’s recommendations.
4. If you’re installing a countertop with seams, use a seam adhesive and clamps to join the sections together securely. Wipe away any excess adhesive with a damp cloth.
5.Install any sink or cooktop cutouts, as well as edge treatments or finishes, according to your design specifications.
6.Seal the seams and edges of the countertops using a silicone caulking to prevent water damage and ensure a clean, finished look.
5.Test and Adjust:
Once the cabinets and countertops are installed, double-check that everything is level, secure, and aligned properly. Test the functionality of drawers, doors, and any other moving parts to ensure they operate smoothly. Make any necessary adjustments or corrections to ensure that the cabinets and countertops meet your standards and design specifications.
Finish Up:
Clean up any debris or dust from the installation process to prepare the space for the next phase of the remodel. Take measurements for any remaining elements such as backsplash or appliances that will be installed later.

8.Install Appliances & Fixtures:
Install new appliances, sinks, faucets, and lighting fixtures. Make sure everything is properly connected and functioning. Installing appliances and fixtures is an essential step in completing your kitchen remodel.
Here’s a guide on how to do it effectively:
1.Prepare the Space:
Ensure that the area where the appliances and fixtures will be installed is clean and free of debris. Double-check measurements to confirm that everything fits properly in its designated space.
2.Install Appliances:
Start by positioning the larger appliances such as the refrigerator, range, and dishwasher in their respective locations. Follow the manufacturer’s instructions for proper placement and clearance requirements. Carefully connect the appliances to the appropriate electrical, gas, and water supply lines. Use the correct fittings and connectors to ensure a secure and leak-free connection. Level the appliances using adjustable feet or shims to ensure they are stable and balanced.
Install any built-in appliances such as microwaves or wall ovens according to the manufacturer’s instructions, making sure they are securely mounted and properly vented.
3.Install Sink and Faucet:
Place the sink into the countertop cutout, ensuring that it fits snugly and is properly supported from underneath. Connect the sink drain and faucet to the plumbing lines, using plumber’s putty or silicone caulk to create a watertight seal.
Install the faucet onto the sink, following the manufacturer’s instructions. Make sure the faucet handles and sprayer (if applicable) operate smoothly and without leaks.
Test the sink and faucet for leaks by running water and checking for any drips or pooling around the connections. Make any necessary adjustments to ensure a tight seal.
4.Install Lighting Fixtures:
Mount ceiling fixtures such as recessed lights or pendant lights according to your lighting plan. Ensure that they are securely anchored to the ceiling joists or support brackets. Connect the electrical wiring for each fixture, following local building codes and safety standards. If you’re not comfortable with electrical work, hire a licensed electrician to do this step. Install under-cabinet lighting if desired, following the manufacturer’s instructions for mounting and wiring. This type of lighting can enhance visibility and ambiance in the kitchen workspace.
5.Test and Adjust:
Once all appliances, sinks, faucets, and lighting fixtures are installed, test each one to ensure they are functioning properly. Check for any leaks, malfunctions, or issues with operation. Make any necessary adjustments or repairs to address any problems that arise.
Final Touches:
Clean up any debris or dust from the installation process to prepare the space for final touches such as backsplash installation or painting.
9.Finish with Flooring & Backsplash:
Install the flooring and backsplash to complete the look of your new kitchen. Make sure to seal any grout lines and properly finish the edges. To finish your kitchen remodel with flooring and a backsplash.
follow these steps:
1.Prepare the Surface:
Ensure the area is clean and dry. Repair any damaged surfaces and remove debris. Make sure the walls are smooth and free of grease or residue.
2.Install Flooring:
Choose your flooring material and begin installation according to manufacturer instructions. Lay down underlayment if required, then start laying the flooring from one corner of the room, working towards the opposite side. Ensure each piece is properly aligned and secured, following the pattern or design you’ve chosen. Cut pieces as needed to fit around obstacles like cabinets and doorways. Once the flooring is laid, allow it to acclimate and settle before proceeding.
3.Install Backsplash:
Measure and plan the layout of your backsplash, considering the pattern and tile size. Apply adhesive to the wall using a trowel, then carefully place each tile, ensuring even spacing. Use tile spacers to maintain consistent gaps between tiles. Cut tiles as necessary to fit around outlets, corners, and other obstacles. Allow the adhesive to set according to the manufacturer’s instructions. Once set, apply grout using a grout float, ensuring it fills all the gaps between tiles. Wipe off excess grout with a damp sponge, then allow it to dry completely.
4.Seal Grout Lines:
After the grout has dried, apply a grout sealer to protect the grout lines from stains and moisture. Use a small brush or applicator to carefully apply the sealer along the grout lines, ensuring complete coverage. Allow the sealer to dry completely before using the kitchen.
5.Finish Edges:
Install trim or molding along the edges of the flooring and backsplash to create a finished look. Use caulk to seal gaps between the flooring, backsplash, and adjacent surfaces, such as countertops and walls.
6.Clean Up:
Remove any excess adhesive, grout, or sealer from the surfaces using a damp cloth or sponge. Clean the flooring and backsplash thoroughly to remove any remaining debris or residue.
7.Final Inspection:
Once everything is installed and sealed, inspect the flooring and backsplash carefully to ensure everything is properly aligned, secured, and finished. Make any necessary touch-ups or adjustments to achieve the desired result.

10.Paint and Decorate:
If necessary, paint the walls and add any decorative elements like trim, molding, or accessories to personalize the space. To complete your kitchen remodel, painting the walls and adding decorative elements is a crucial step to personalize the space.
Here’s how to proceed:
1.Choose Paint Colors:
Select paint colors that complement the overall design and style of your kitchen. Consider factors such as natural light, cabinetry color, and the desired mood or atmosphere you want to create.
2.Prepare the Walls:
Clean the walls thoroughly to remove any dirt, grease, or residue. Patch any holes or imperfections with spackle, then sand the surface smooth. Use painter’s tape to protect trim, cabinets, and other surfaces from paint splatter.
3.Prime the Walls (if necessary):
Depending on the condition of the walls and the type of paint you’re using, you may need to apply a primer before painting. Primer helps seal the surface and provides better adhesion for the paint.
4.Paint the Walls:
Start by cutting in around the edges of the walls using a brush, then use a roller to fill in the larger areas. Work in small sections and apply paint evenly to avoid streaks or drips. Allow the first coat to dry completely before applying a second coat if necessary.
5.Add Decorative Elements:
1.Install Trim and Molding: Enhance the look of your kitchen by adding crown molding, baseboards, or wainscoting. Measure and cut the trim to fit, then secure it in place using a nail gun or adhesive.
2.Hang Artwork or Decor: Add personality to your kitchen by hanging artwork, photographs, or decorative objects on the walls. Choose pieces that complement the color scheme and style of the space.
3.Incorporate Accessories: Finish off the look of your kitchen with accessories such as decorative bowls, vases, or plants. Place them strategically on countertops, shelves, or islands to add visual interest and warmth to the space.
Final Touches:
Remove painter’s tape and any protective coverings from surfaces. Clean up any paint spills or drips using a damp cloth or sponge. Step back and admire your newly painted and decorated kitchen, taking pride in the personalized touches that make it uniquely yours
Enjoy Your New Kitchen: Once the remodel is complete, take some time to enjoy your newly renovated kitchen! Invite friends and family over to show off your hard work.
Certainly! Here are some frequently asked questions related to kitchen remodeling and their answers:
Q: How long does a kitchen remodel typically take?
- A: The timeline for a kitchen remodel can vary depending on the scope of the project, but it generally takes anywhere from several weeks to a few months to complete. Factors that can affect the timeline include the complexity of the remodel, availability of materials, and coordination of contractors.
Q: How much does a kitchen remodel cost?
A: The cost of a kitchen remodel can vary widely depending on factors such as the size of the kitchen, the quality of materials used, and the extent of the renovations. On average, homeowners can expect to spend anywhere from $10,000 to $50,000 or more for a complete kitchen remodel.
Q: Do I need to hire a professional for my kitchen remodel, or can I DIY it?
A: The answer depends on your level of experience and the complexity of the remodel. While some homeowners may be able to tackle certain aspects of the remodel themselves, such as painting or installing new hardware, other tasks, such as electrical or plumbing work, are best left to professionals.
Q: How can I maximize storage space in my kitchen?
A: There are several ways to maximize storage space in a kitchen, including installing custom cabinets with built-in organizers, adding a kitchen island with storage underneath, and utilizing vertical space with tall cabinets or shelving units. You can also consider incorporating pull-out drawers, lazy Susans, and other clever storage solutions.
Q: What are some eco-friendly options for a kitchen remodel?
A: When planning a kitchen remodel, consider using sustainable materials such as bamboo flooring, recycled glass countertops, and low-VOC paint. Energy-efficient appliances can also help reduce energy consumption and lower utility bills. Additionally, incorporating natural light with skylights or energy-efficient windows can minimize the need for artificial lighting.
Q: How do I ensure my kitchen remodel stays within budget?
A: To keep your kitchen remodel within budget, it’s essential to carefully plan and prioritize your expenses. Start by setting a realistic budget and stick to it as much as possible. Research costs for materials and labor upfront, and get multiple quotes from contractors to compare prices. Be prepared to make trade-offs and compromises if necessary to stay within your budget constraints.
Q: What are some current trends in kitchen design?
A: Some current trends in kitchen design include open shelving, mixed materials (such as combining wood and metal), bold colors or patterns for backsplashes, and smart technology integrated into appliances and fixtures. Other popular trends include statement lighting fixtures, large kitchen islands with seating, and minimalist or Scandinavian-inspired design aesthetics.


